If you are a blogger and are wanting to start or grow your email list, this post will explain why email lists are essential to running a profitable blogging business as well as providing step-by-step instructions on how to use my preferred email service platform, ConvertKit.
Most people assume that food blogging is simply cooking and publishing recipes online. In reality, that is actually only a very small portion of what I do!
Food blogging, and blogging in general, requires a TON of background work. For me, a primary portion of my behind-the-scenes work involves building my email list.
Why email lists for bloggers are so important
If you’re interested in making money through blogging, growing your email list should be your NUMBER 1 PRIORITY. I’m serious.
Did you know that 39% of Americans report to check their emails at least three times per day? That’s A LOT of people who are regularly refreshing their inbox looking for a new message to pop up.
During 2018 and 2019, my primary goal was to grow my email list. In just 10 months, I grew my email list by over 10,000 new subscribers and, in that time, have almost doubled my monthly income. My blog’s success is directly correlated to my email list growth.
When traffic enters my website, one of my main goals is to get these people to sign up for my email list. Why?
Email lists are the only way to directly contact your readers. You call the shots, because you’re wholly in charge of it! You determine when to provide content, and at what frequency.
There’s no algorithm to learn. When you send out an email, you know that everyone on your list will see it! That’s not the case with social media. Algorithms on Instagram, Facebook, and the like are constantly changing and updating and it feels virtually impossible to have all of your followers see your content without paying for ads. Plus, some people, nowadays, aren’t using Facebook and Instagram at all, which is leading you to miss out on vital opportunities to reach your target audience.
It’s personal. Email lists allow your audience to get to know you in a way that social media doesn’t. Because you’re not glued to a format or certain structure, emails allow you the freedom to be yourself!
At the end of the day, having a way to directly notify and alert your audience is invaluable. It’s the ultimate tool to use for announcements, launches, giveaways, affiliate sales, and so much more.
Email Converts People More Than Any Other Platform
Emails convert. For every $1 you spend on email marketing, you’ll see an average return of $32. Pretty awesome right?!
Emails consistently outperform other social media channels. According to aggregate data gathered by Gumroad and reported on by ConvertKit, here’s the percentage of people who come to a sales page and actually purchase from social media platforms and from email:
- YouTube: 2.2%
- Twitter: 5.4%
- Facebook: 6.3%
- Email: 9.4%
As you can clearly see, email surpasses other platforms and, in some cases, like with YouTube, is over 4x more successful at converting.
Plus, according to one study, targeted email marketing has more than a 200% higher conversion rate than just sending the same emails to all of your subscribers.
Targeted emails allow you to specifically write emails targeted at a particular segment of people, which is extremely beneficial when speaking to your audience.
For my list, we segment constantly. Whether that be segmenting people based on how they signed up for my list, their previous interactions with my emails, their purchase history, and even where they live. This has proven to be wildly successful and is why I never suggest always sending your entire list the same emails.
This is where the power of ConvertKit comes in.
Unlike other email service providers, ConvertKit allows you to segment and target specific groups of people on your list, rather than just sending general newsletters out to everyone.
ConvertKit is a GAME-CHANGING to level up your blogging business. More on this later.
How to start an email list
Before you can start adding contacts to your email list, you need a provider. The provider will store all of your contacts and serve as a platform for creating and sending campaigns.
MailChimp is a free tool that’s a great option for new email lists, but I wouldn’t suggest sticking with it long-term. It’s customizable and allows you to send out newsletters, design campaigns, and more, which is basically all you really need to worry about it the beginning.
Down the road, once your email list starts growing, I definitely recommend using ConvertKit as it’s much more robust because it allows for segmentation, filtering, tagging, link triggers, and so much more!
How to build an email list
People aren’t going to sign up for an email list without being offered something VALUABLE in return. This is why it’s so important to know your audience!
Offering a lead magnet (also commonly referred to as a “freebie”) in exchange for sign-ups is essential. Your lead magnet(s) could be cheat sheets, free eBooks, email challenges, or a video series. As long as the freebie provides value, it will work!
When it comes to framing email capture calls-to-action, you’ll need to tell readers why they should sign up. As an example, you could say something like, “Download my 10 tips for creating recipes on a budget!” In exchange for getting the free download, they will provide their email address and subscribe to your list.
Include these calls to action throughout all of your posts, but also in the form of a pop-up opt-in. I use Opt In Monster for mine, and I find this to be a very successful method!
What to send subscribers
Once your email list begins to grow, you may feel stuck and lost for what to send out. When this happens, think back to why readers signed up for your list in the first place… to receive value. Keep providing it! Here are some ideas.
- Weekly content and updates
- Discounts on products you love (with affiliate links)
- Product sales
- Blog post round-ups or recaps
- Recycled content
- Free resources
MailChimp vs. ConvertKit
I built my initial email list with MailChimp. At the time, it was FANTASTIC! It provided me with all of the necessary tools to reach my audience, and I really loved it.
As my email list grew, I began to come up with new ideas and knew that I needed a more robust platform. I tried out ConvertKit, and I haven’t looked back!
What is ConvertKit? I’m SO glad you asked! ConvertKit, like MailChimp, is an email service provider. The main things that make the two providers so different are the added features. Unlike MailChimp, ConvertKit offers:
- Segmented contacts: This allows you to send custom-tailored emails to different groups depending on their interests. (This feature alone was enough to convince me to migrate to ConvertKit.)
- Automated sequences: Plan out completed automated series to introduce new products, alert customers, and more.
- Personalized emails: ConvertKit allows you to easily add contacts’ names to emails, which is a great way to personalize your messages and to grab their attention.
- Landing pages: As you begin to offer more content, some things may require a landing page. ConvertKit has a landing page feature, making this process super smooth!
- Integrations: Depending on your blog, you may find yourself needing integrations to simplify your processes. ConvertKit offers these, such as with WordPress and WooCommerce.
ConvertKit makes email list building so effective
As you begin building your email list, a lot of things will be trial and error. Try split testing landing page and opt-in form copy and be sure to measure results! Over time, you’ll see your subscriber list skyrocket before your eyes.
What to do about email list unsubscribers
If you happen to see a contact or two unsubscribe (which you will, because everyone does), remind yourself that it’s nothing personal at all. They simply were not your ideal audience. Think of it as a blessing, as this means that your audience is now more closely aligned with the content that you share!
How to send an email broadcast in ConvertKit
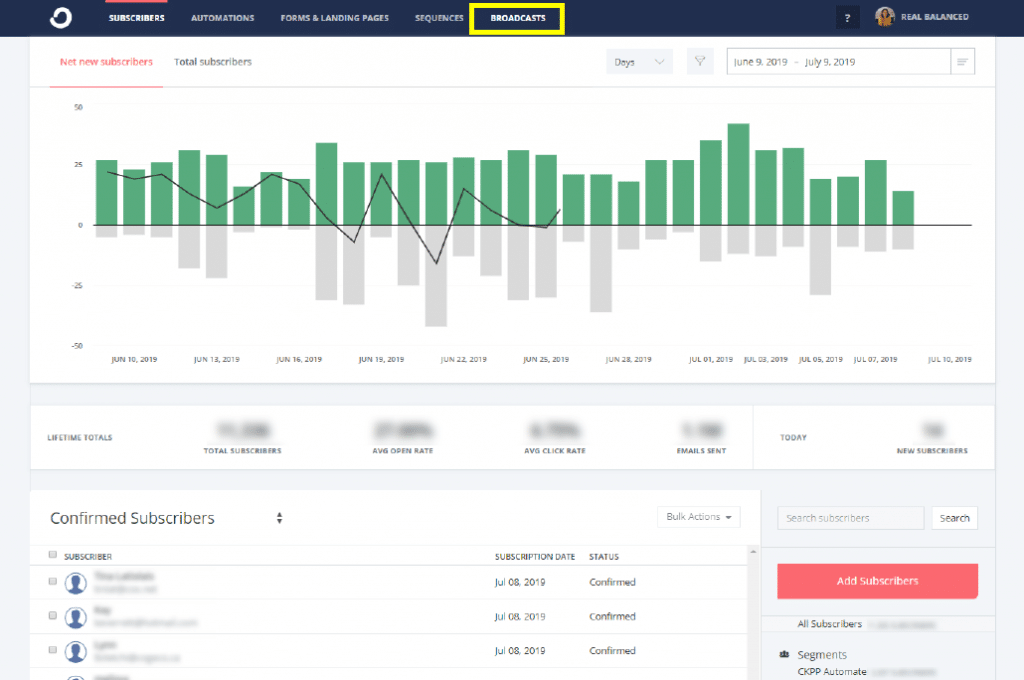
Log in to your ConvertKit account. Click on the BROADCASTS tab.
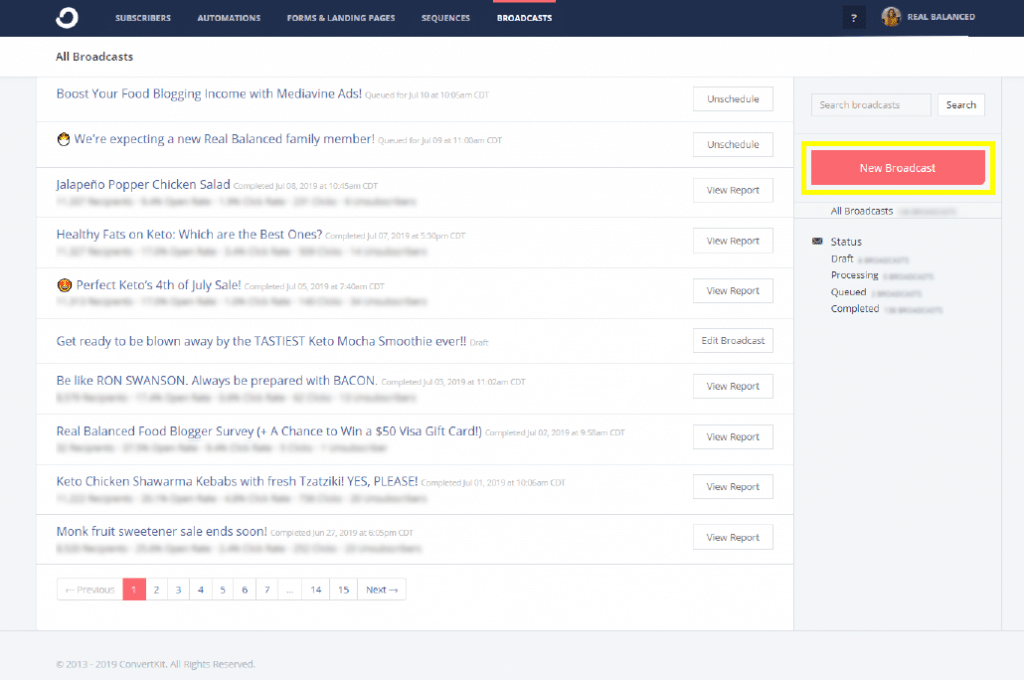
Click the New Broadcast button.
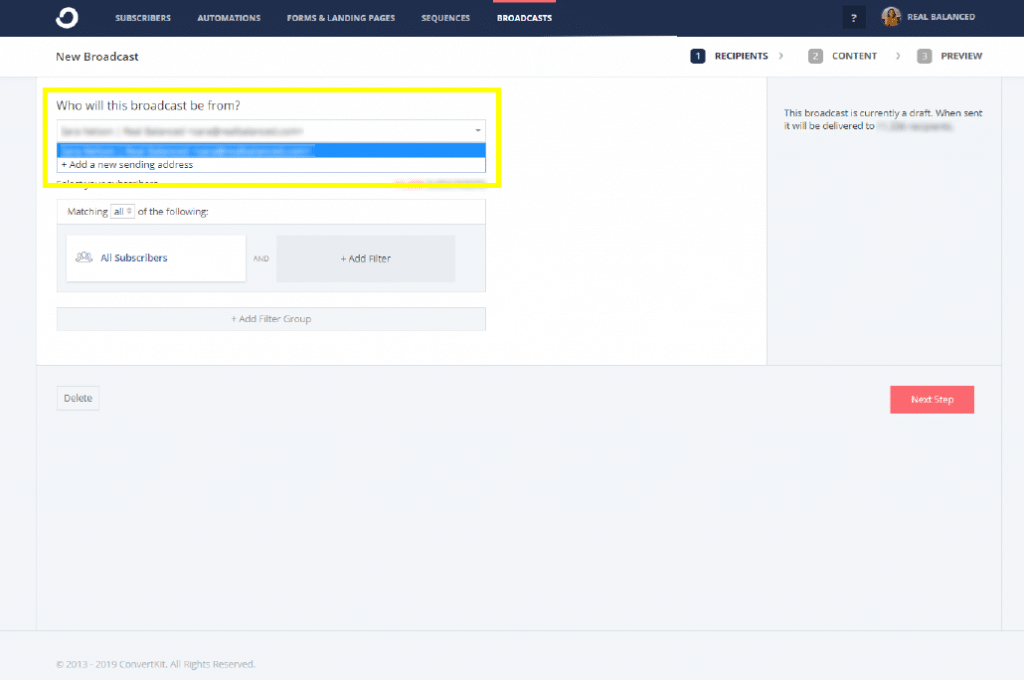
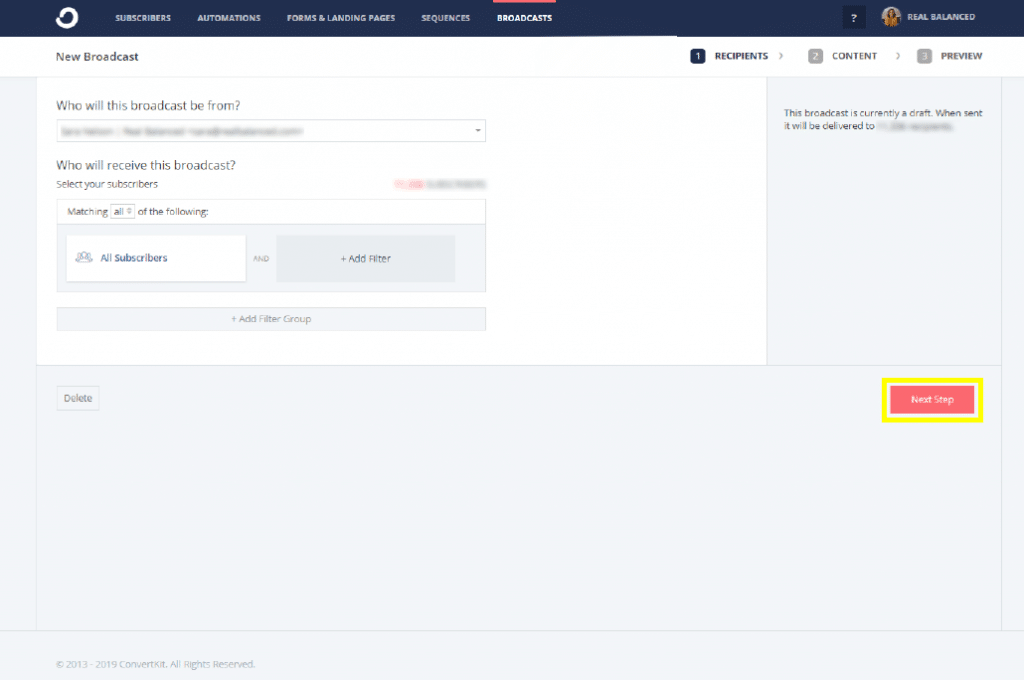
Select who your broadcast will be from by clicking the drop-down arrow and who will receive the broadcast by adding a filter.
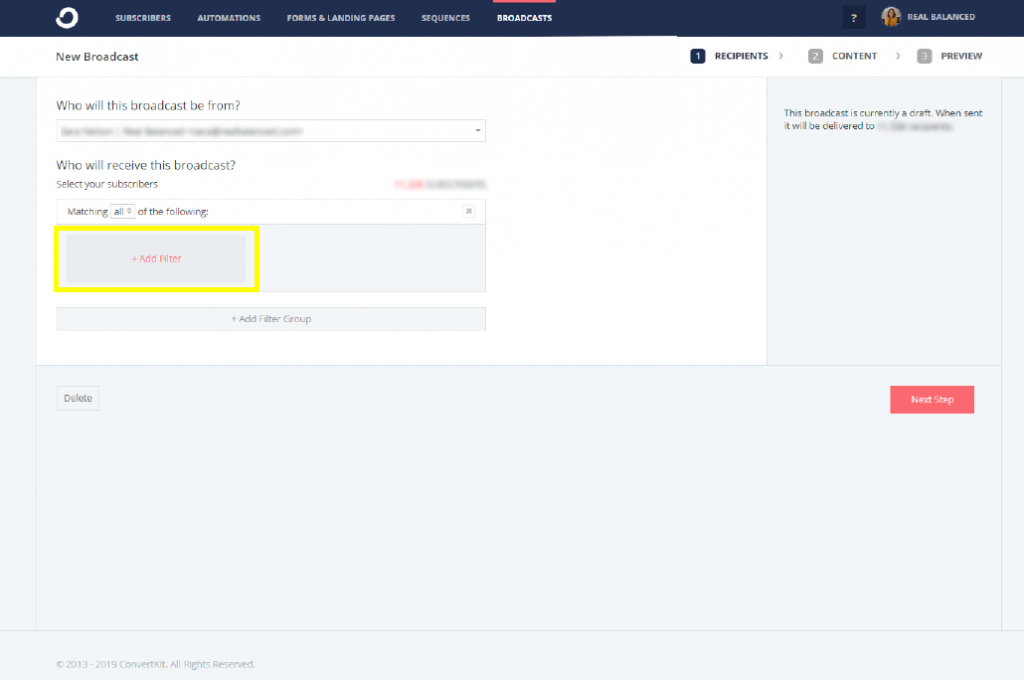
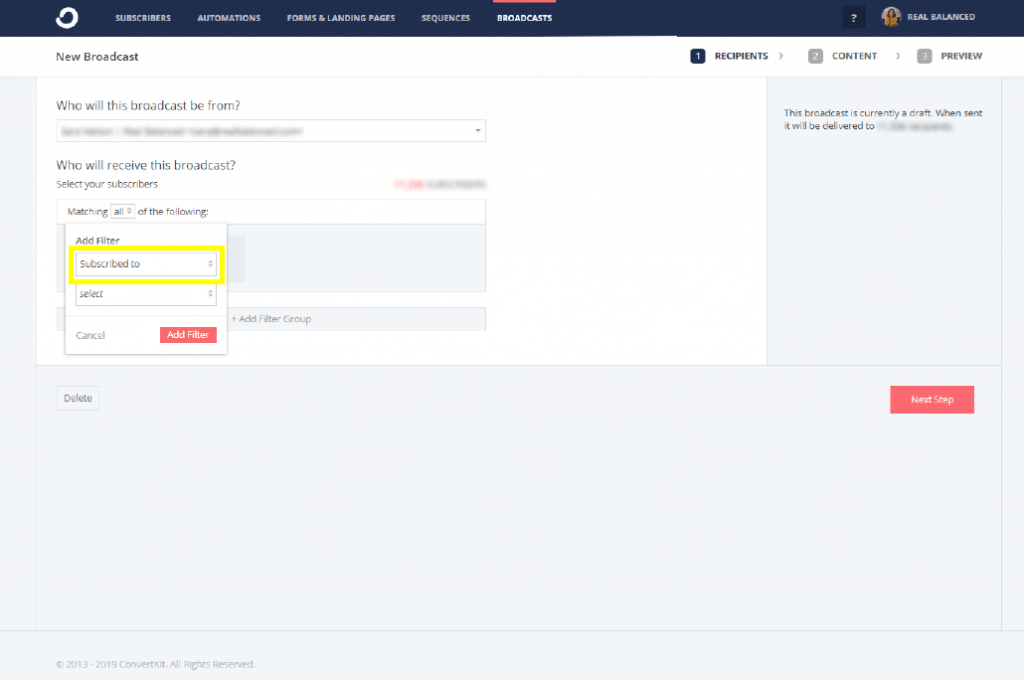
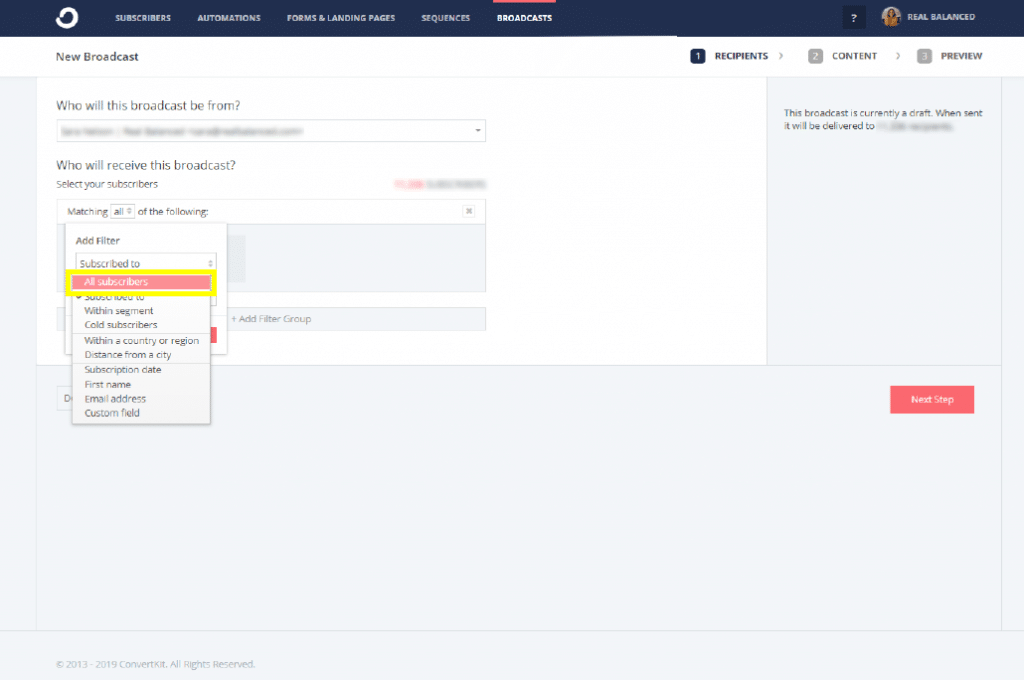
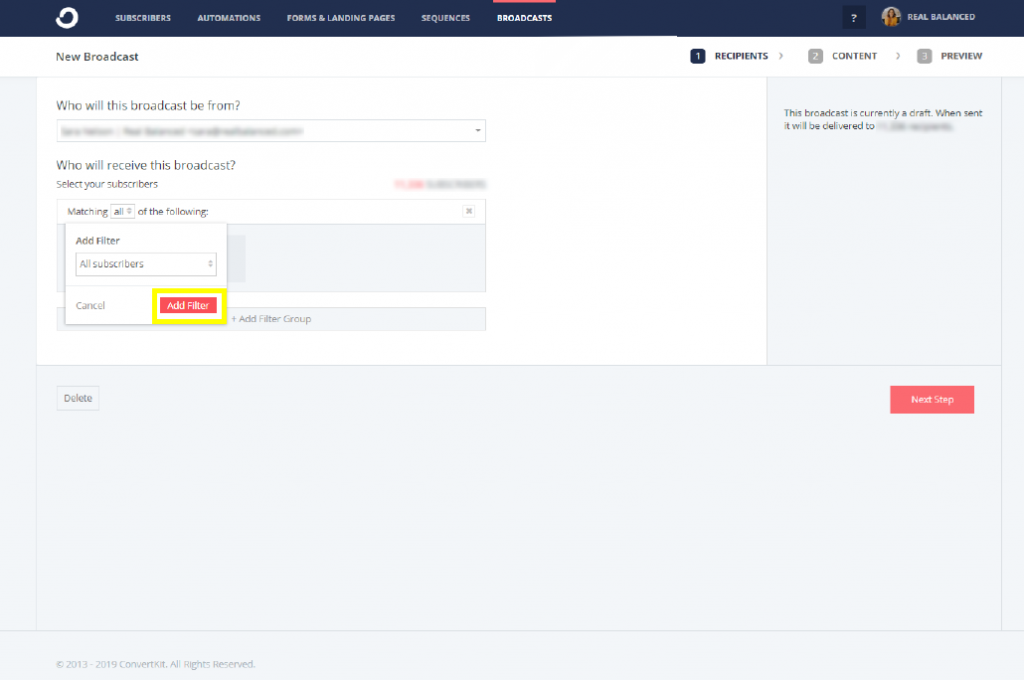
Once you’ve decided the sender and receiver details for the broadcast, click the Next Step button on the bottom right-hand side of the page.
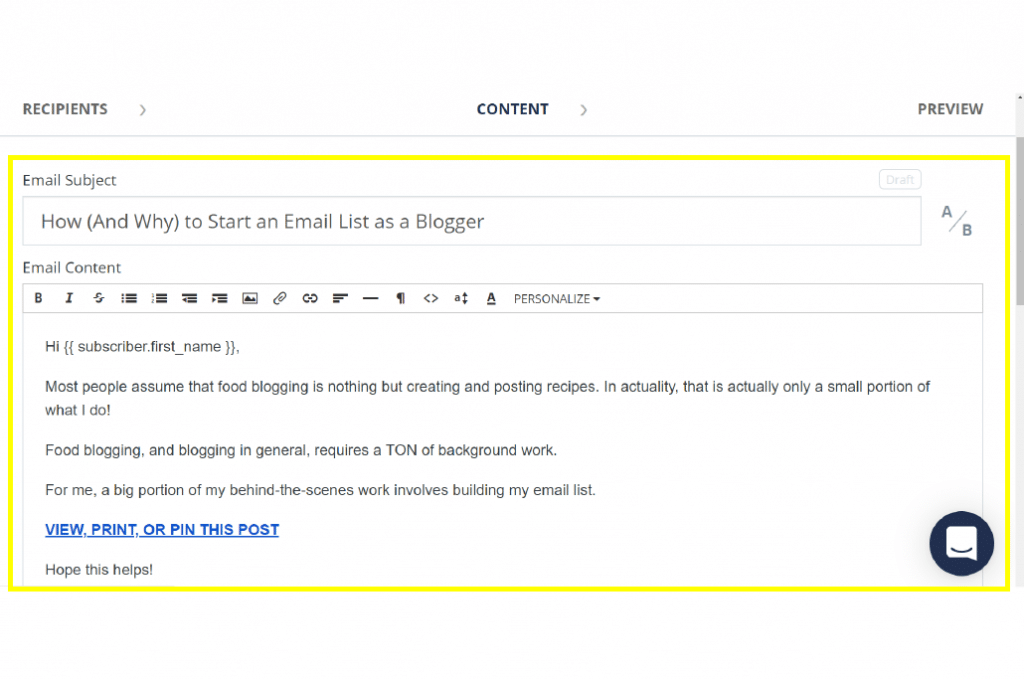
Update the Email Subject field as well as the Email Content field with the content you wish to send out.
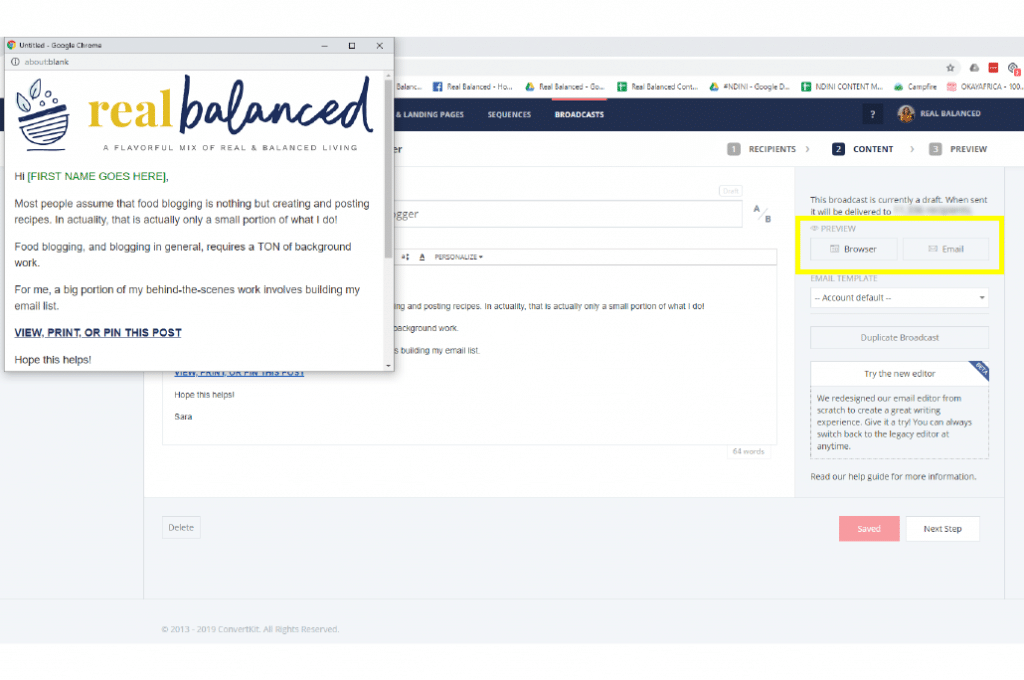
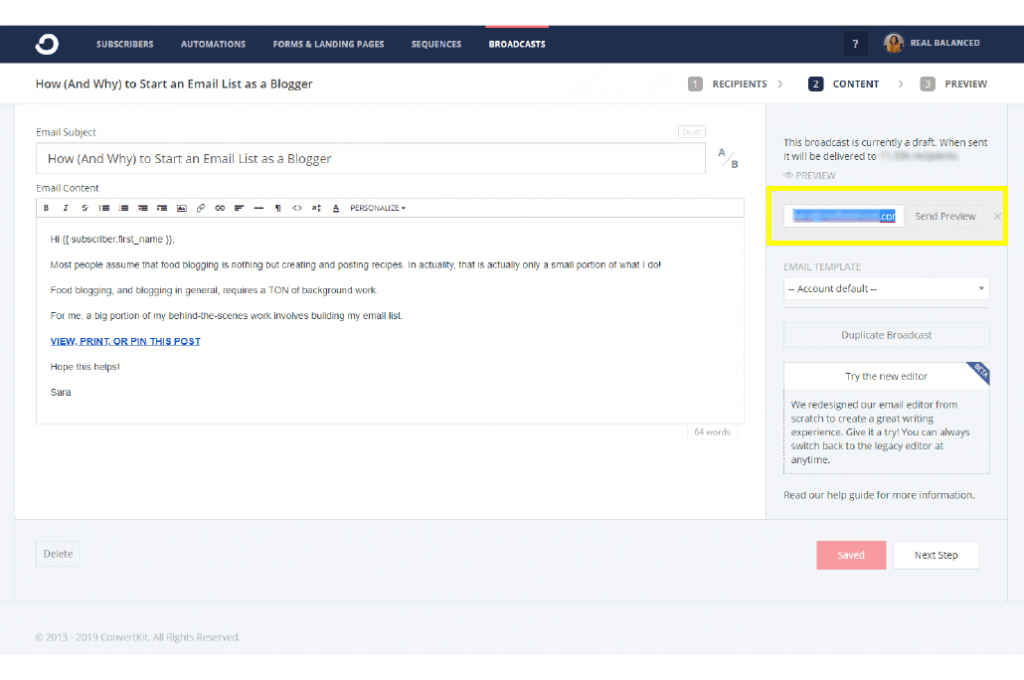
You can PREVIEW your email broadcast, either by clicking on the Browser view OR by sending yourself an Email preview and simply emailing the drafted email to yourself so you can see exactly what it will look for your readers. We highly recommend doing an email preview. (Tip: check your email on both desktop and mobile to ensure formatting looks good!)
Once you’re satisfied with your draft, go ahead and click the Next Step button.
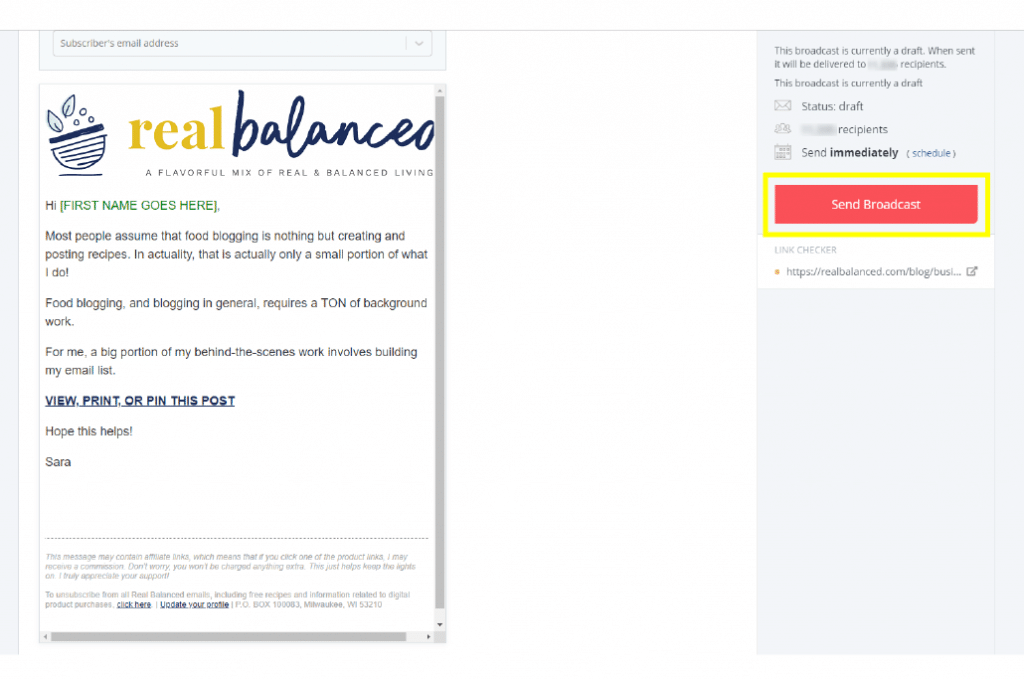
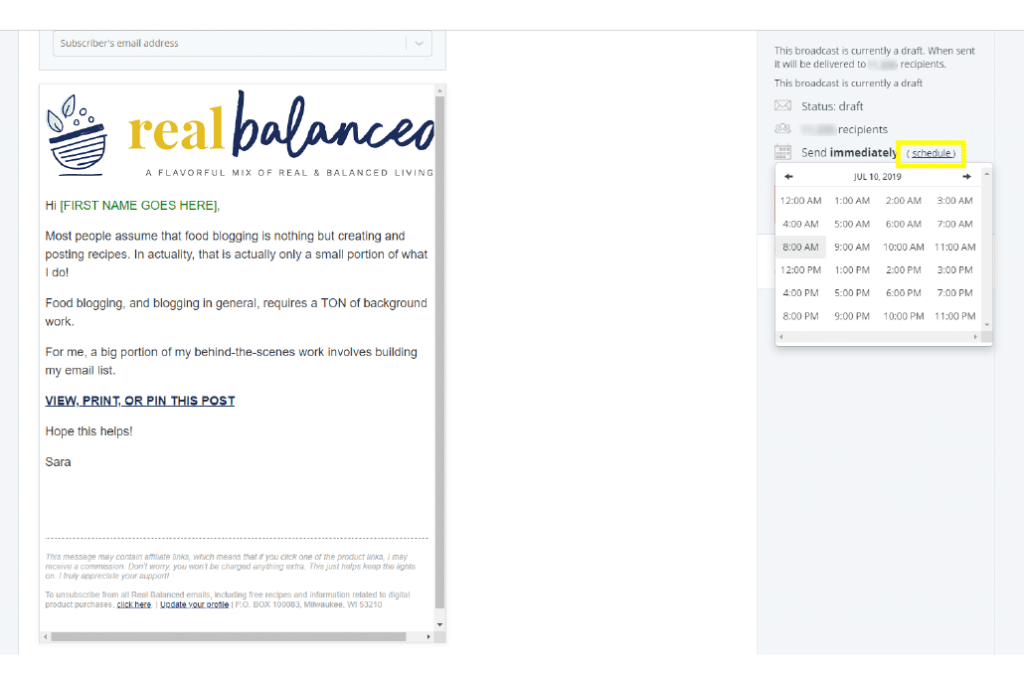
The next step is where you can check your email broadcast’s the links, sender, recipients, and all the other details. Clicking Send Broadcast sends the email immediately, while (schedule) is if you want it to publish much later.
Send Broadcast:
Schedule:
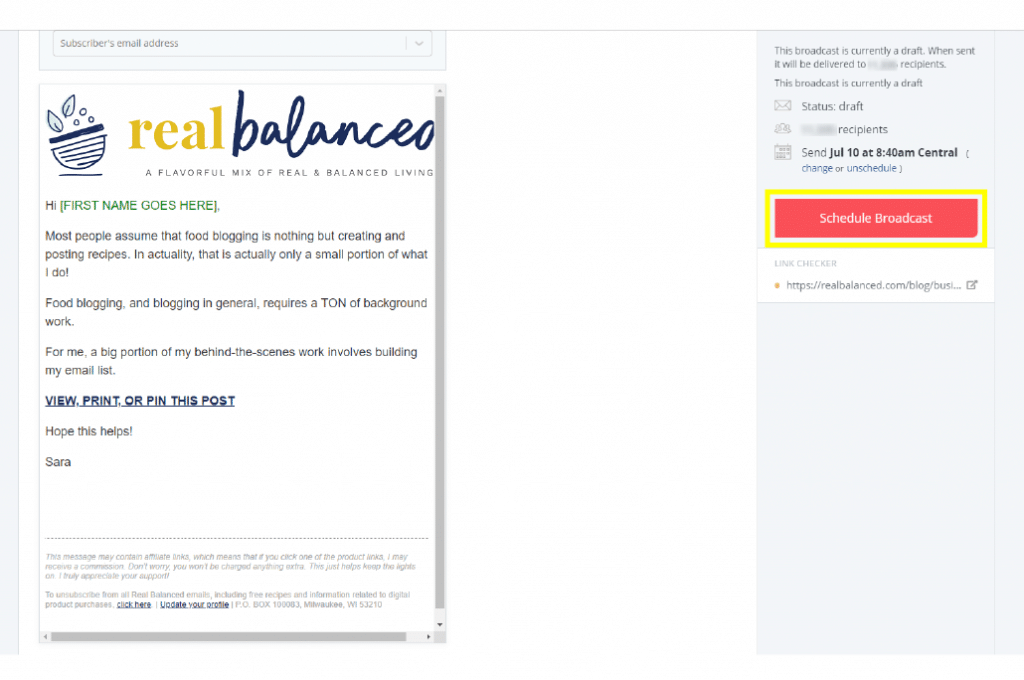
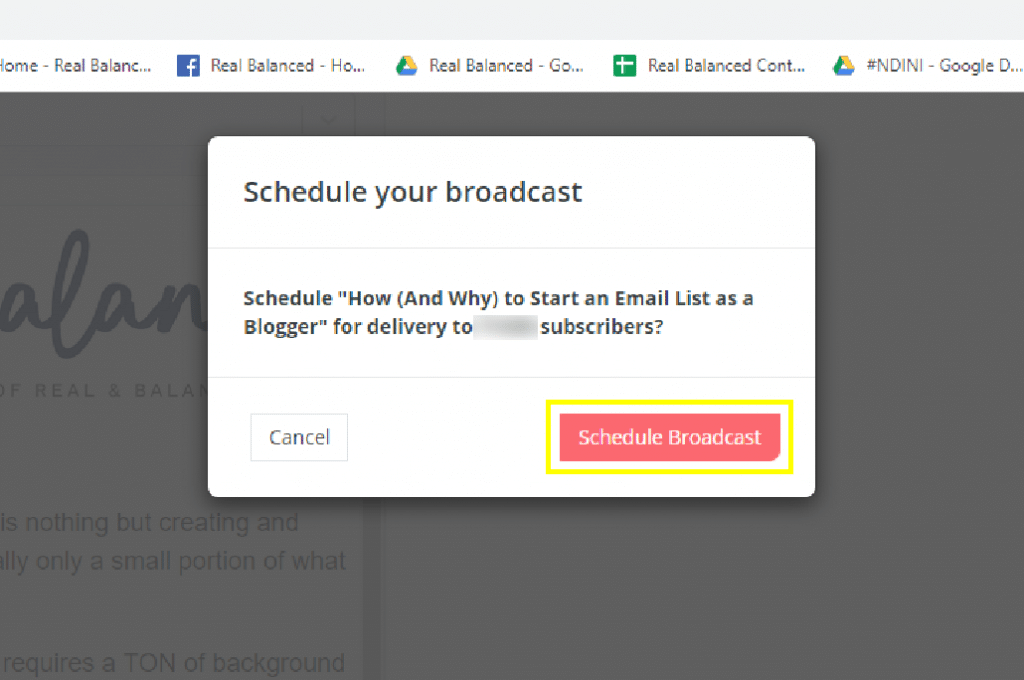
Once you’ve scheduled the post, it will show up on All Broadcasts and it will have the schedule details in gray (Queued for Jul 10 at 8:40 am CDT), plus a button that says Unschedule.
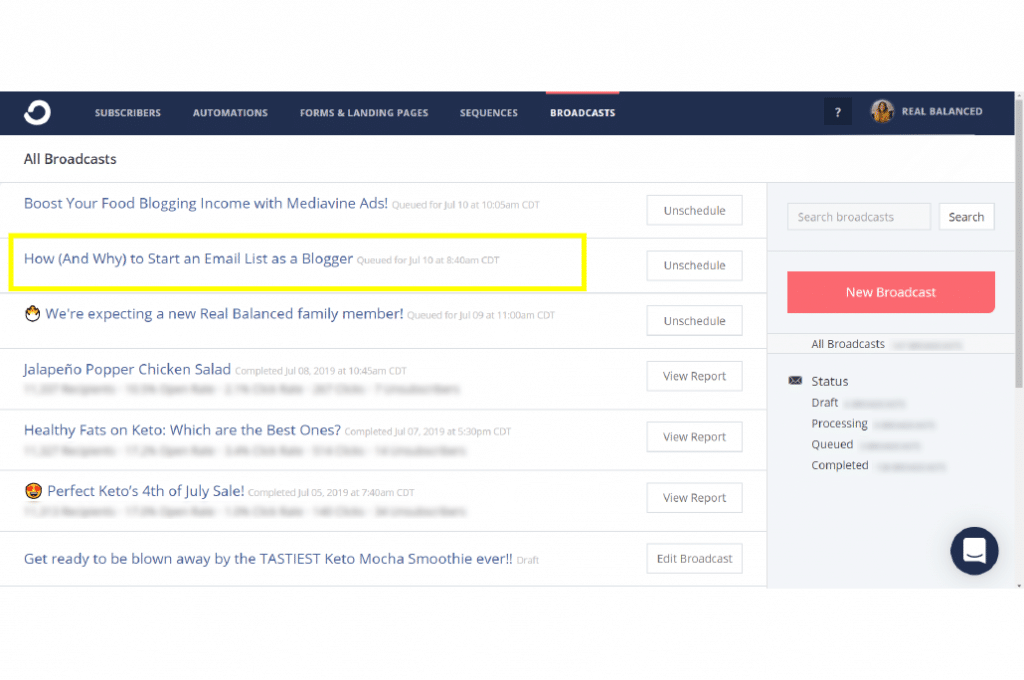
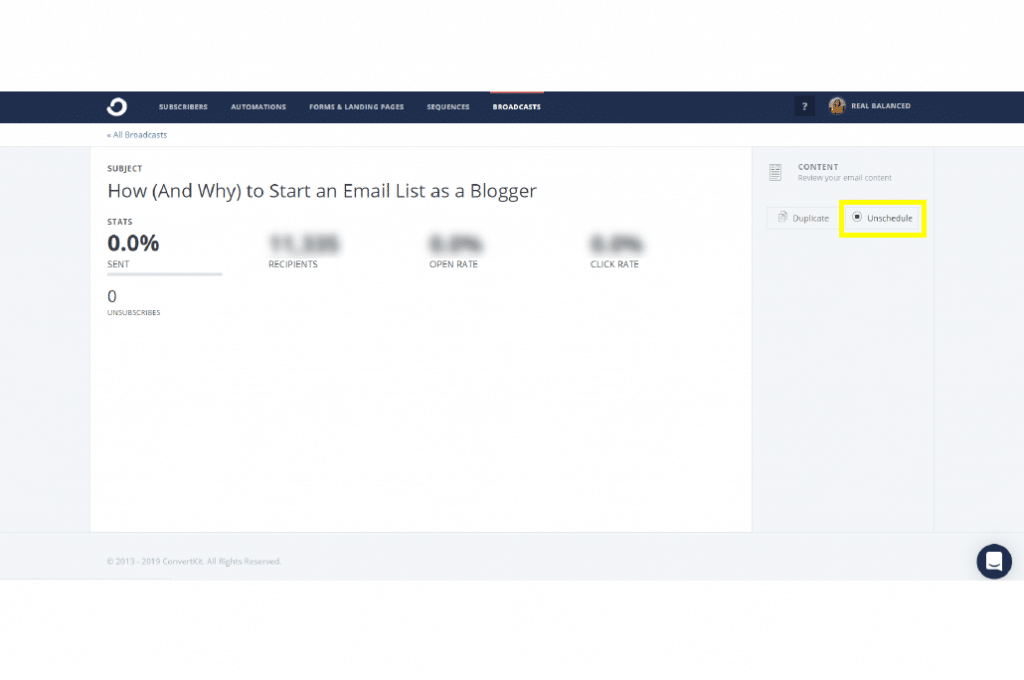
If you need to change anything on your post, just click on the Unschedule button. Once you click Unschedule and go back to All Broadcasts, the button beside your email will, instead, say Edit Broadcast. Then you can make the changes and go through the same steps before sending or scheduling your email.
How to set up a Form in ConvertKit
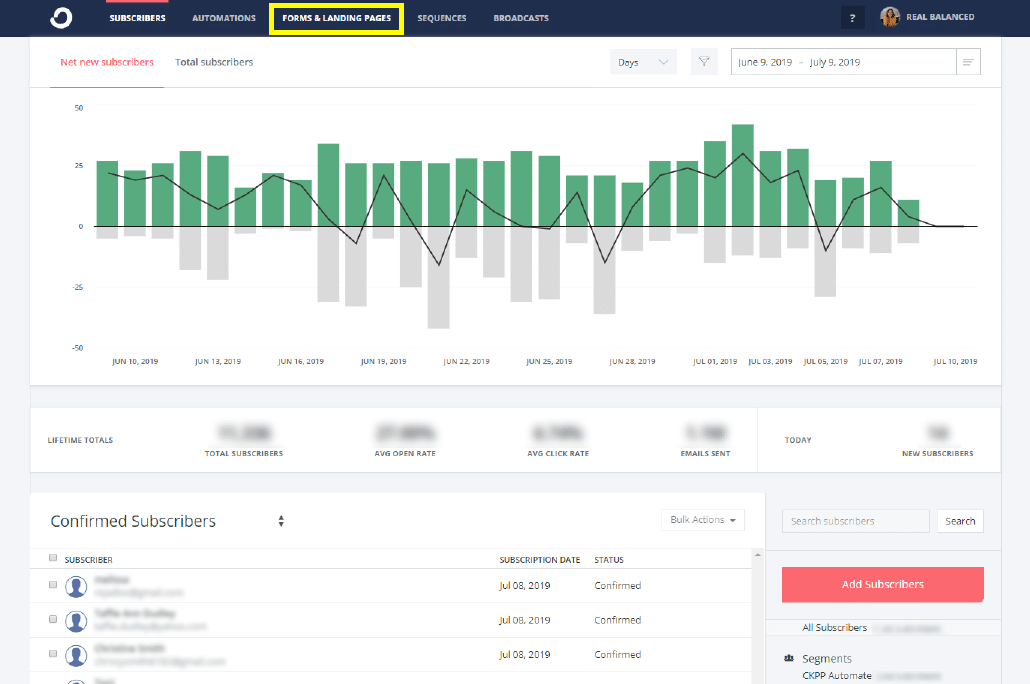
Login to your ConvertKit account and navigate to the FORMS & LANDING PAGES tab.
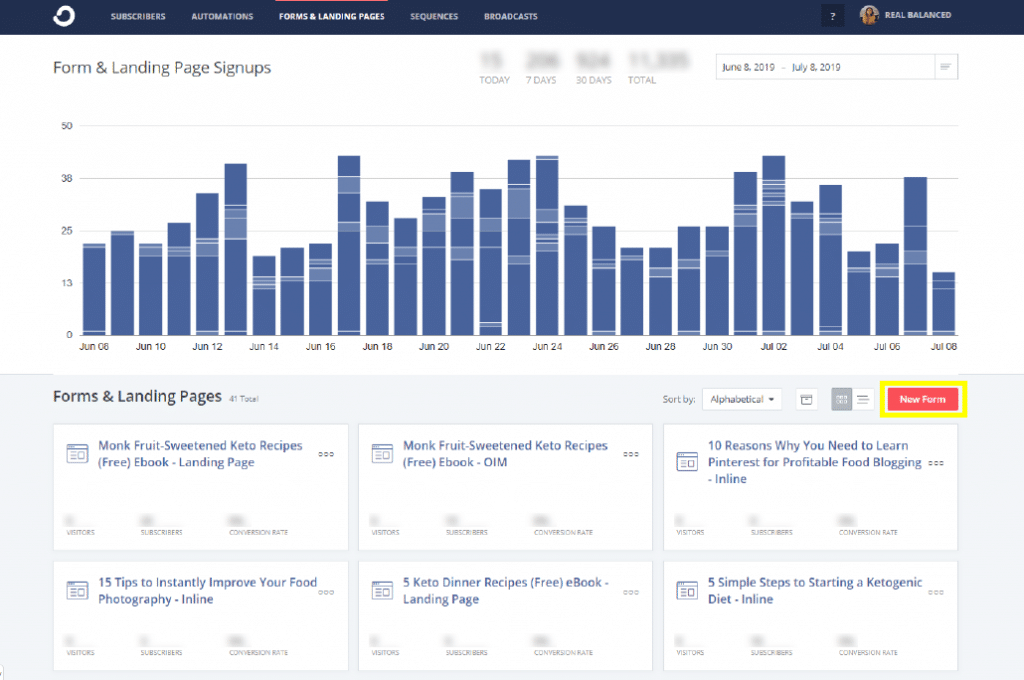
Click New Form.
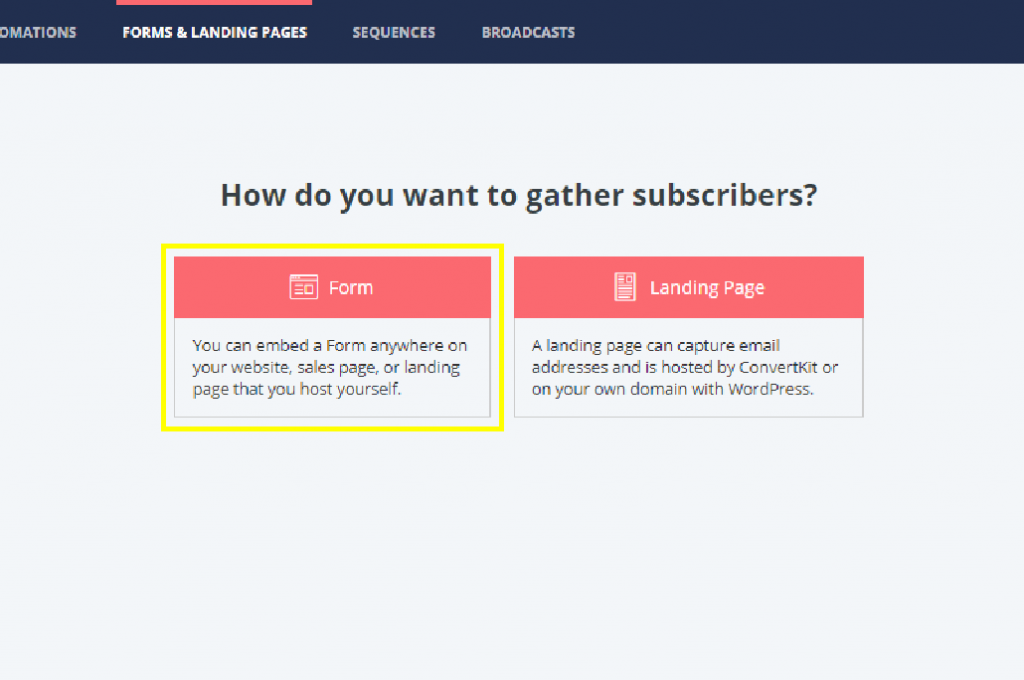
In the next page, you will be asked how you want to gather subscribers (either Form or Landing Page), choose Form.
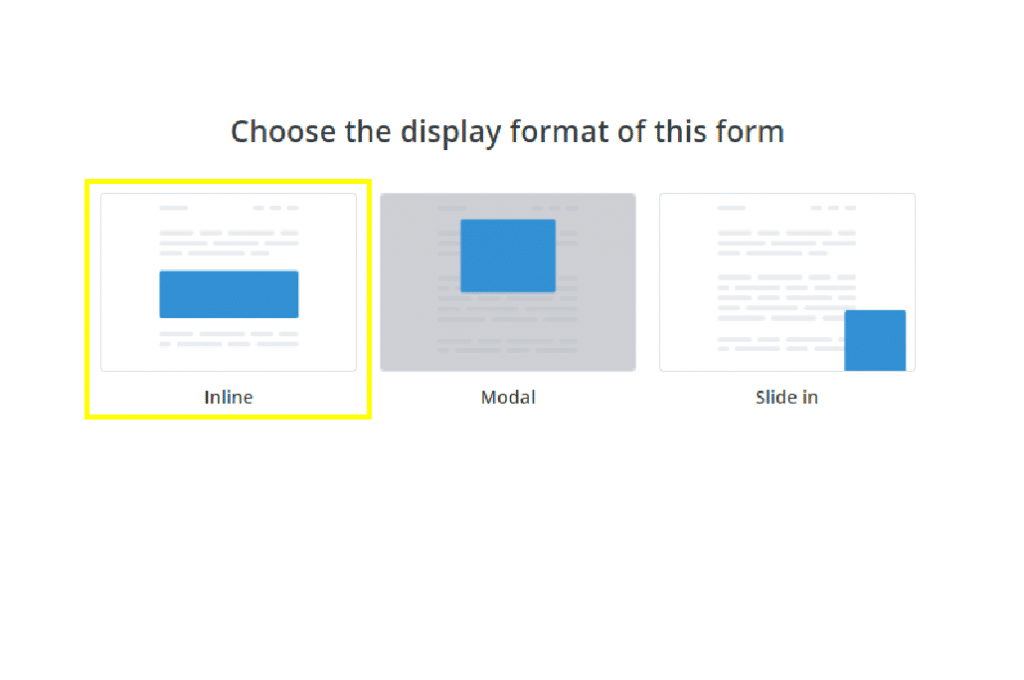
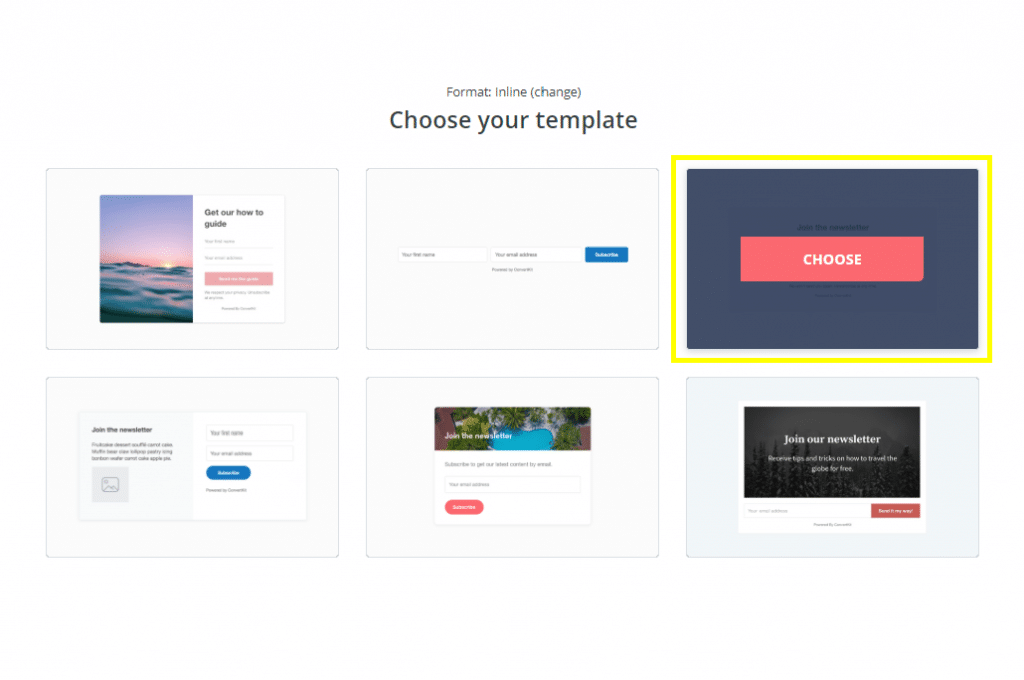
Forms have 3 display formats: Inline, Modal, and Slide in. (In this example, we’ll choose Inline.)
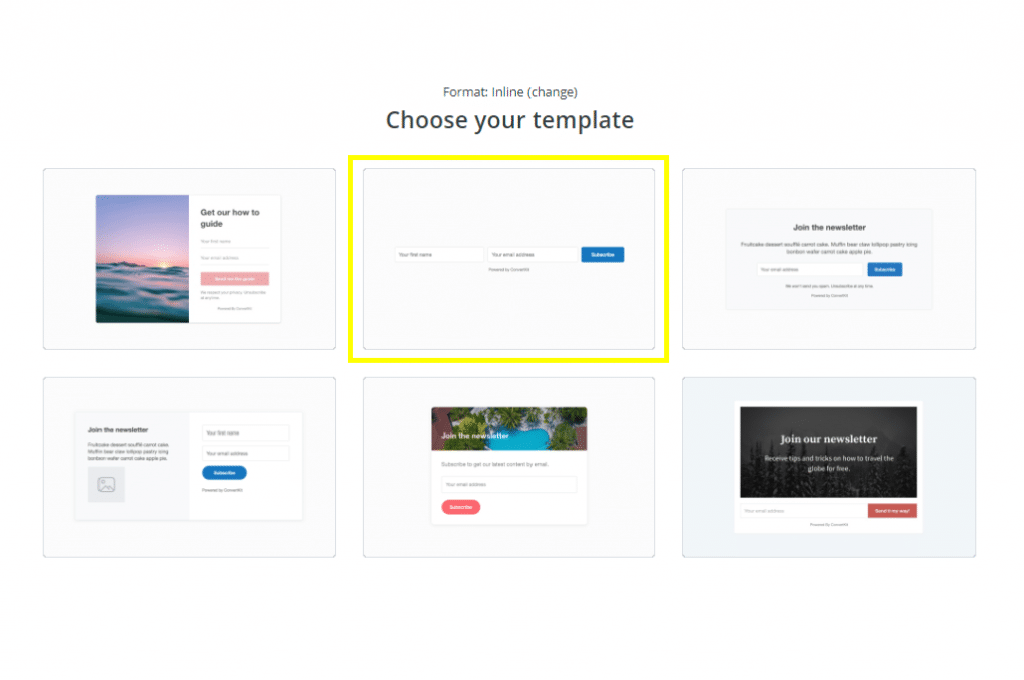
Pick the template you want to use. (In this example, we used template #2.)
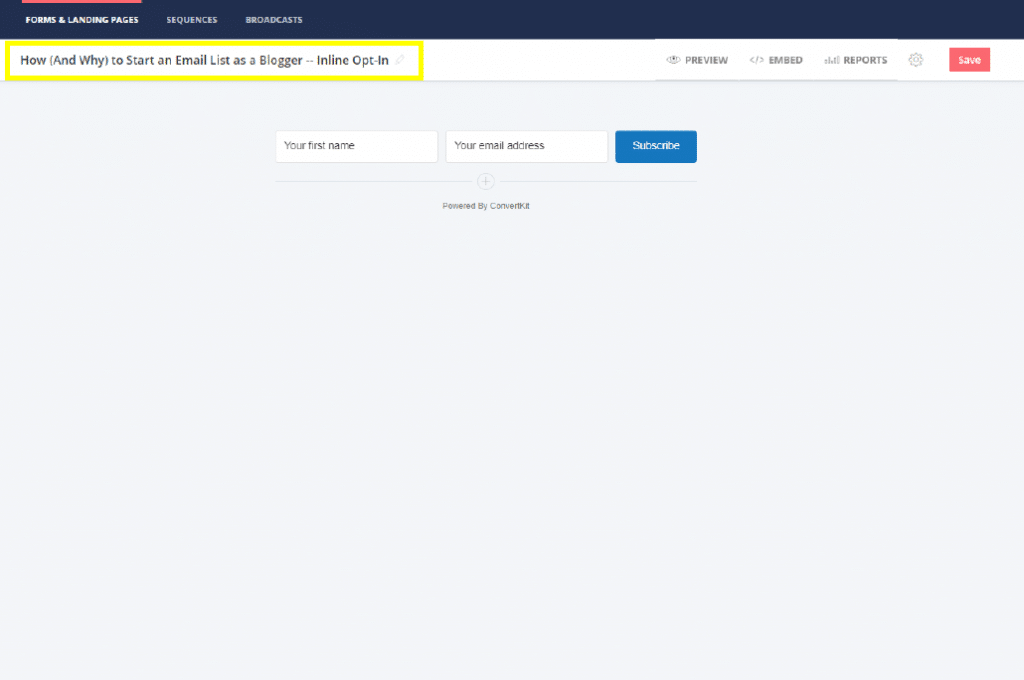
In the upper left-hand corner (below FORMS & LANDING PAGES), click on the pencil icon to edit the name of your form.
Pro Tip: Make sure to use something to describe what it’s for, so you can easily remember it’s function and avoid getting confused years from now when you have even MORE forms.
Click on the mail icon to Edit Email Contents OR auto-confirm new subscribers.
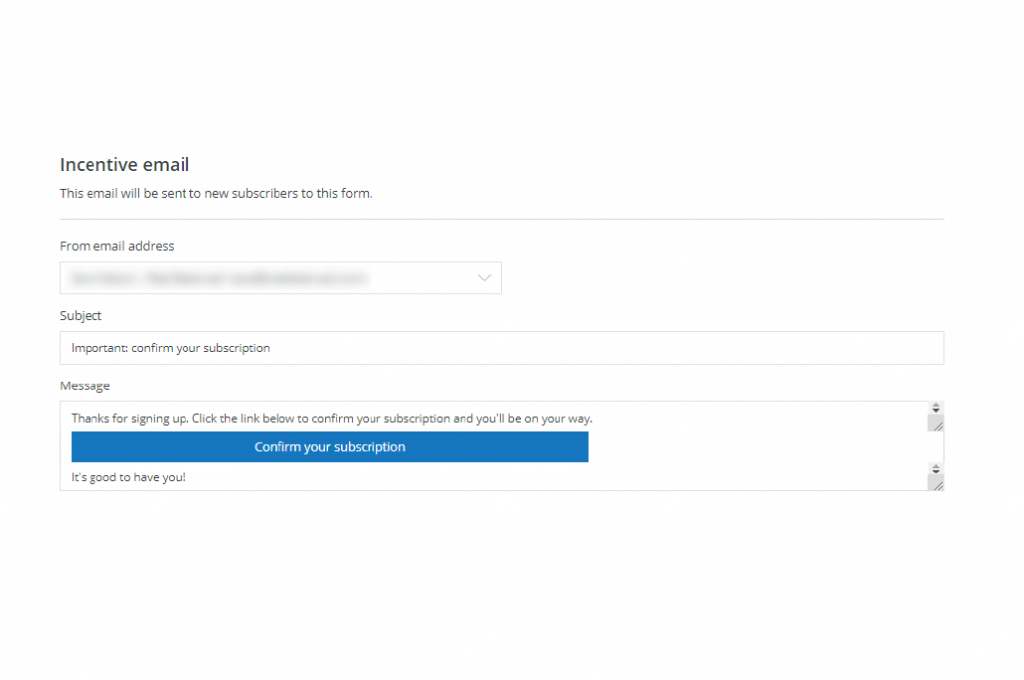
If you uncheck the Send incentive email option, it will look like this and say, “This will allow you to provide an Incentive download or link. You will have the option to auto-confirm or not. Without this email, all subscribers will be auto-confirmed.” I do not recommend auto-confirming subscribers as this can lead to spam subscribers who will just cost you money by expanding your list with zero benefit.
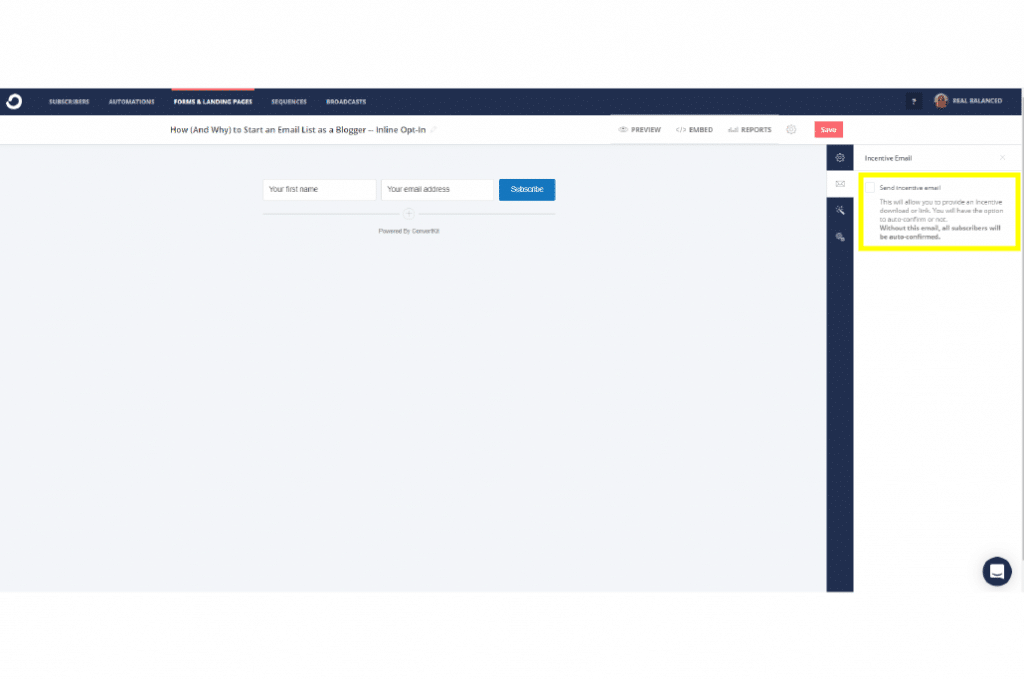
Next, decide where to redirect your confirmed subscribers. You can send them to either a URL or a direct download link. In this example, we send them to a URL.
Note: We use Amazon S3 to store both our paid and free content.
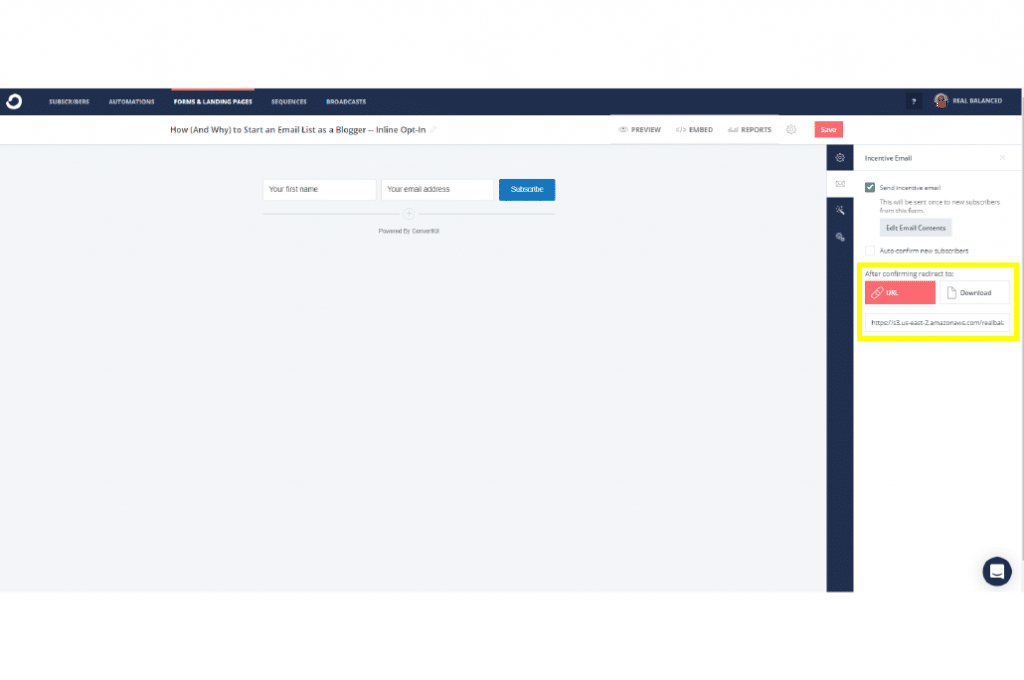
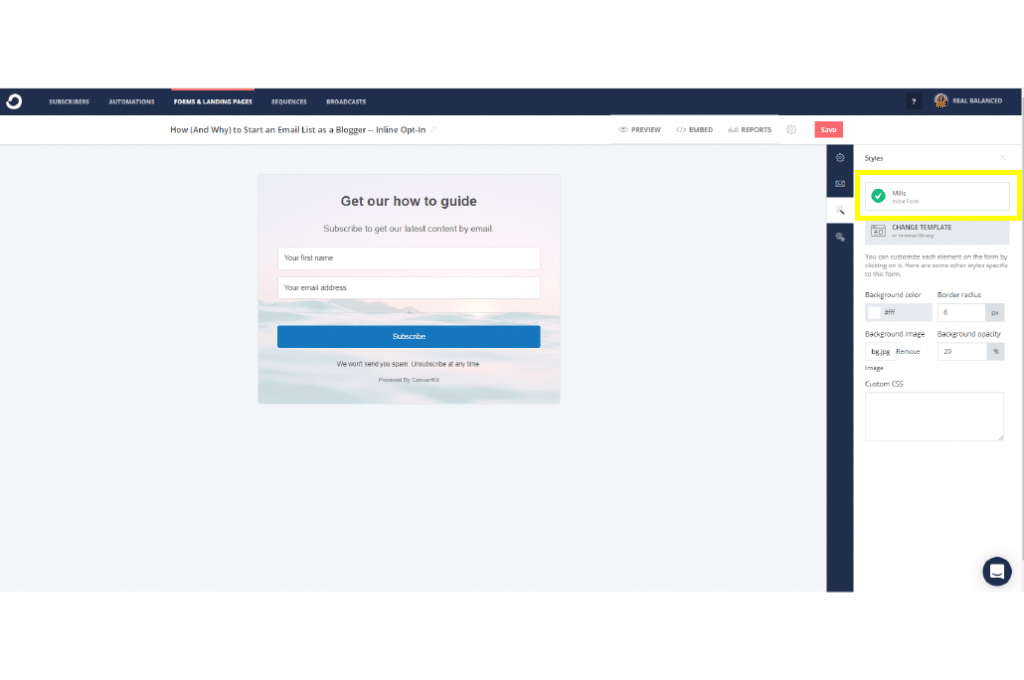
The wand icon is for when you want to change the appearance of your form.
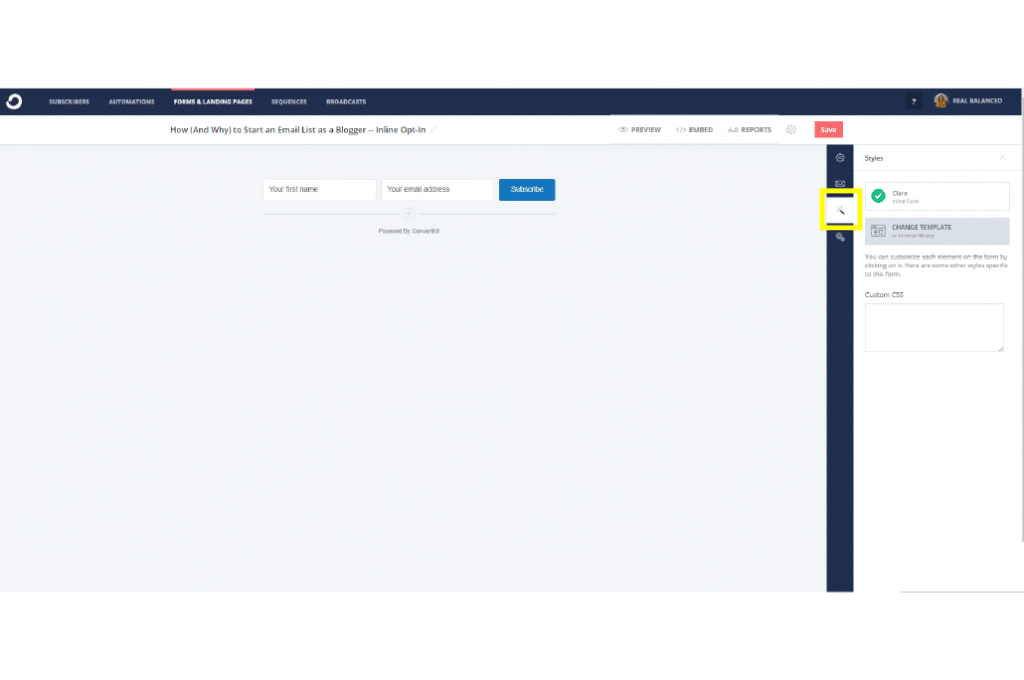
It’s also where you can jump in and change your form template. For the more design-savvy entrepreneur, you can pick any of the other 5 templates. In this example, we changed the template into template #3.
You will notice that the Inline Form name has changed from Clare to Mills.
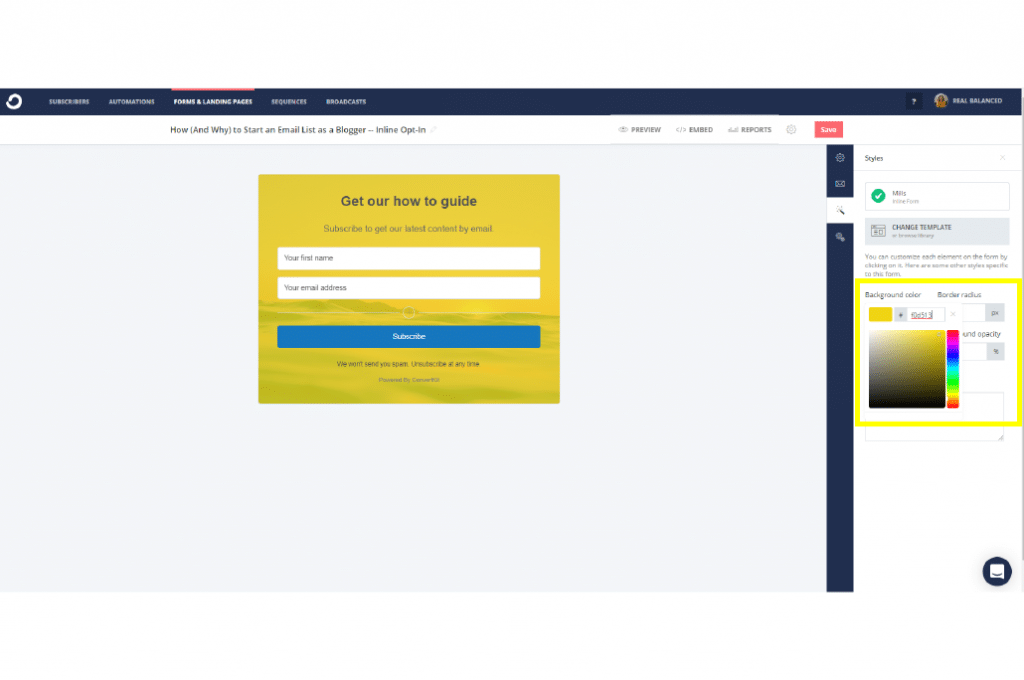
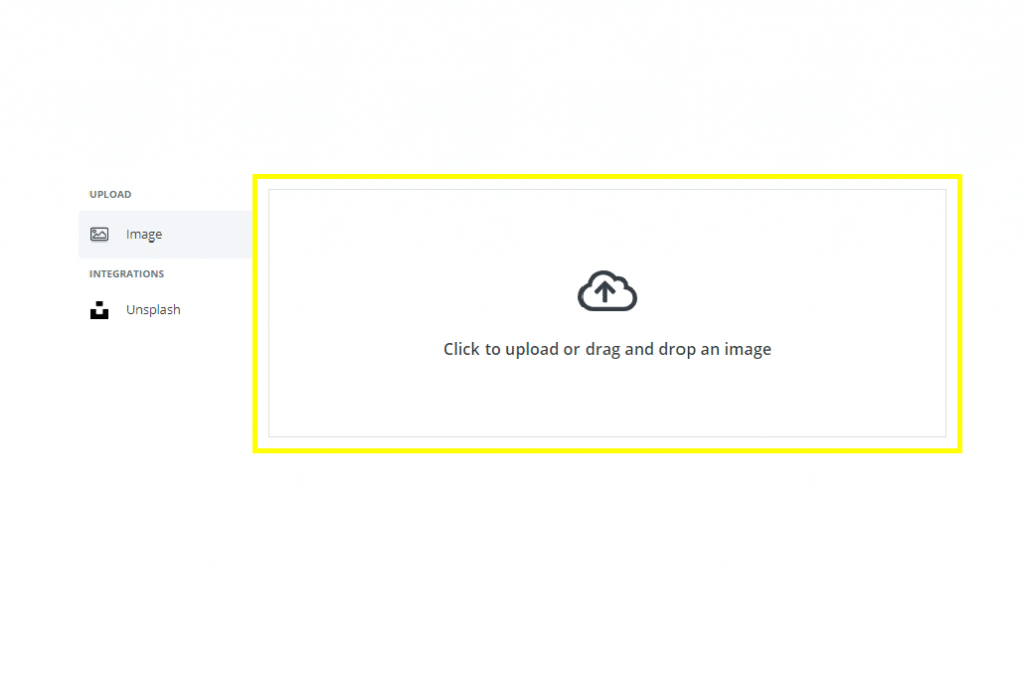
You can change the background color to reflect your brand colors and upload a background image. If you’re code adept, then you can add it on the Custom CSS field.
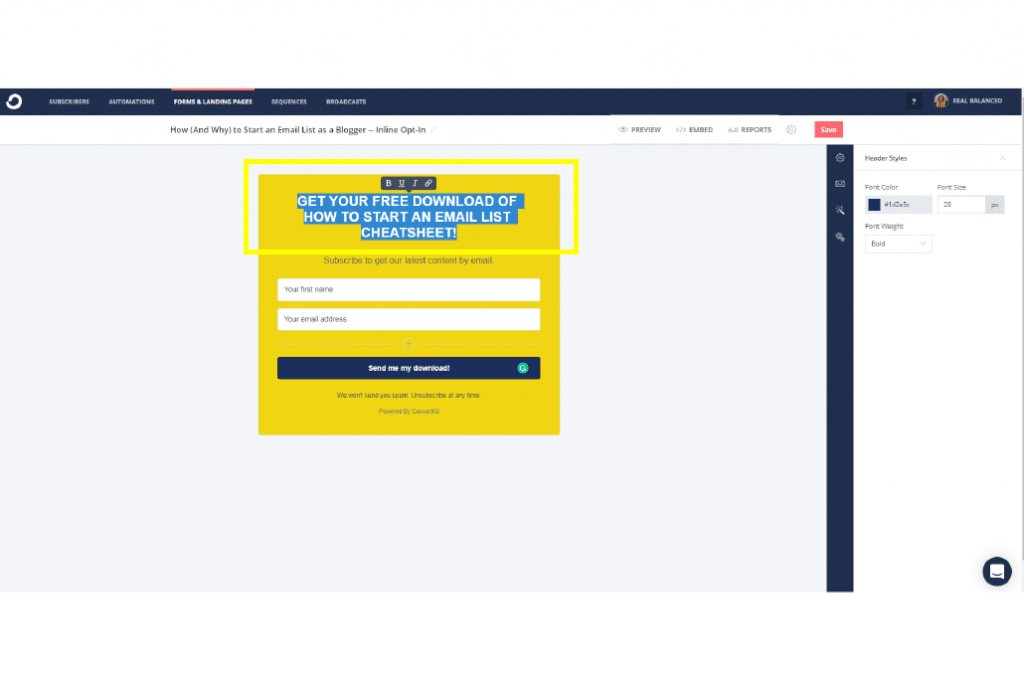
Click on the individual elements of the form and update the texts (e.g. description, required info fields, call-to-action button). You can change the Font Color, Size, and Weight on the righthand side of the page.
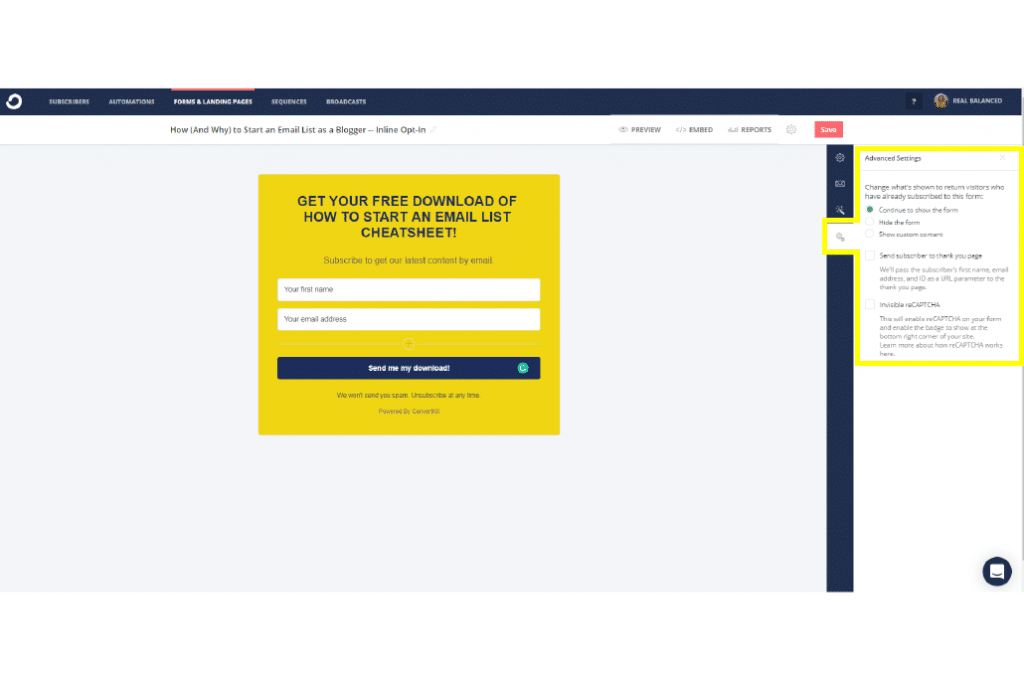
The Advanced Settings is where you can control where the subscriber will be routed to when they return to the same form. We usually just leave it at Continue to show the form.
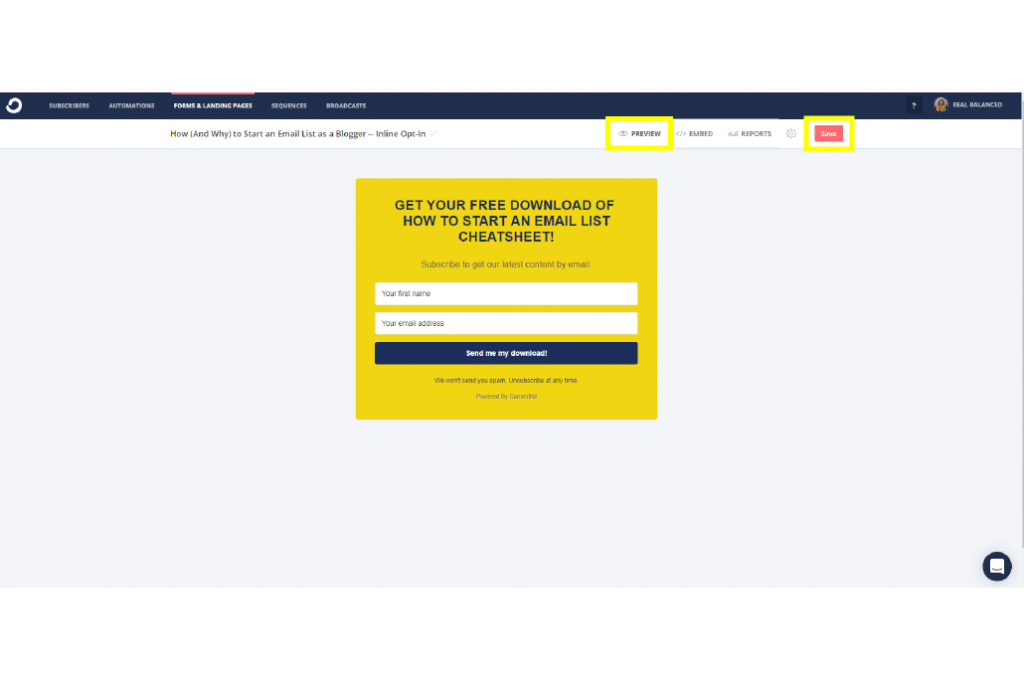
Click Preview and hit Save if you’re satisfied with your custom form.
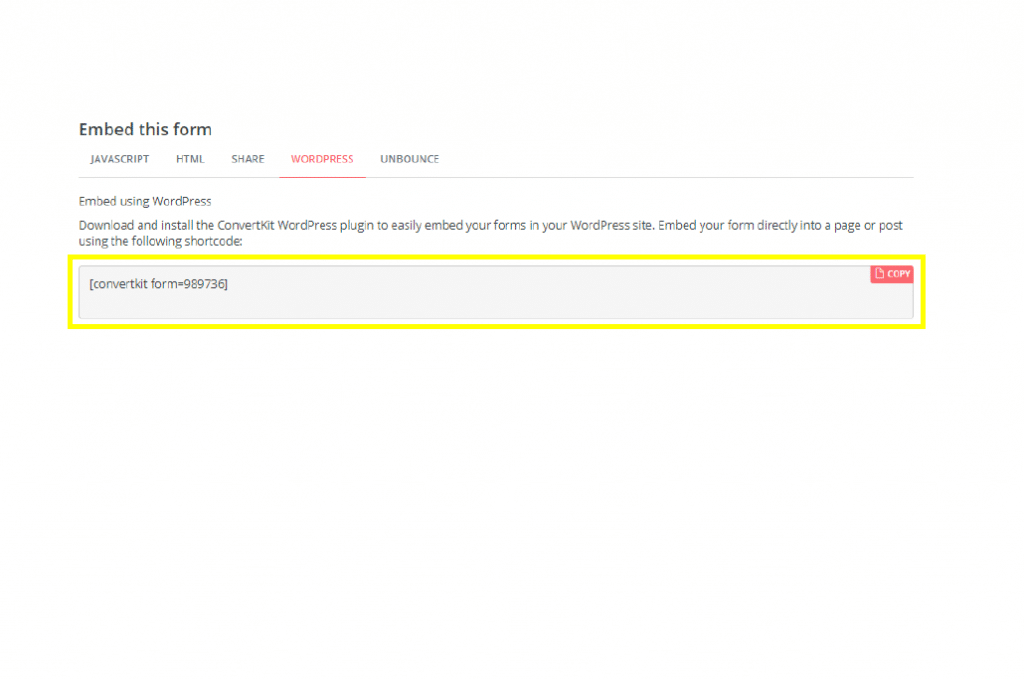
Click Embed to get the embed code/link to add onto your site, post, or page.
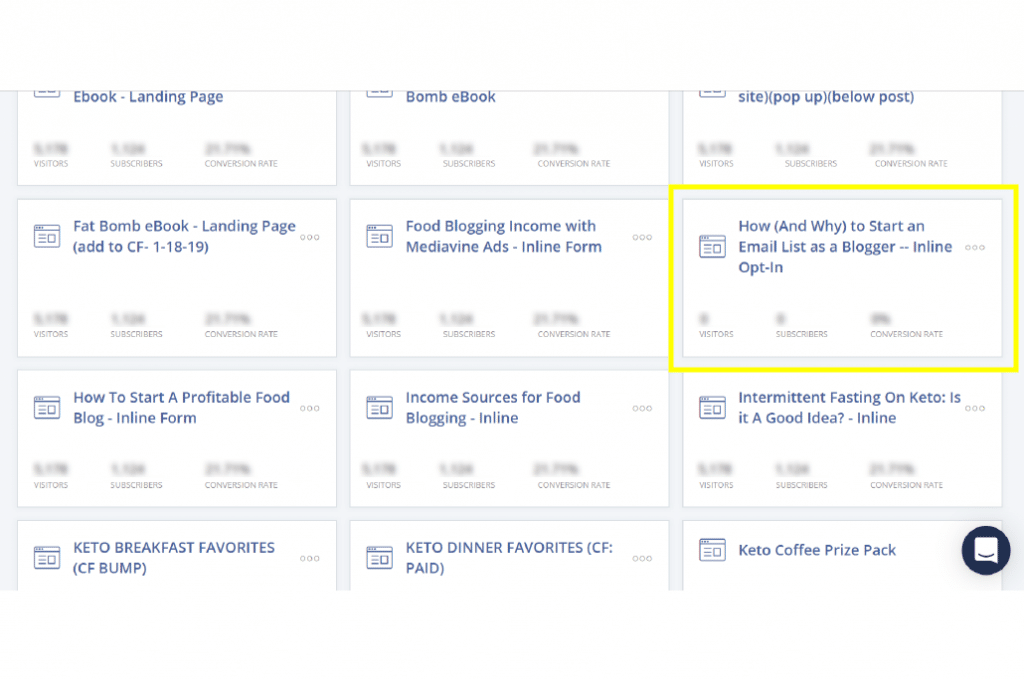
Now, when you head back to the FORMS & LANDING PAGES tab, you can find the form you created listed there.
How to set up a Sequence in ConvertKit
Log in to your ConvertKit account. Click on the SEQUENCES tab.
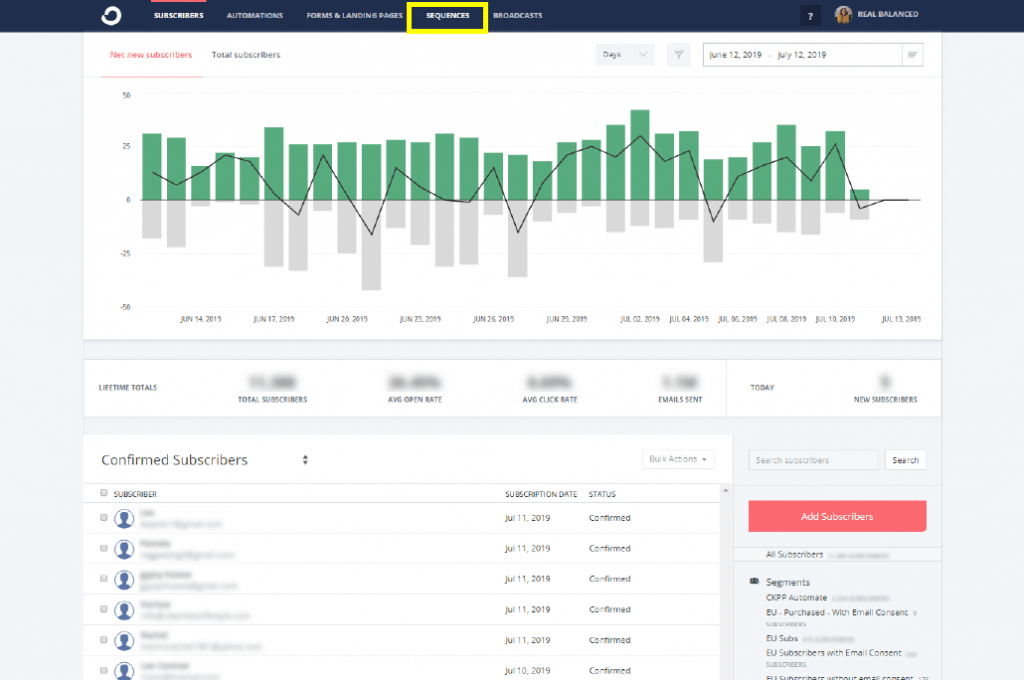
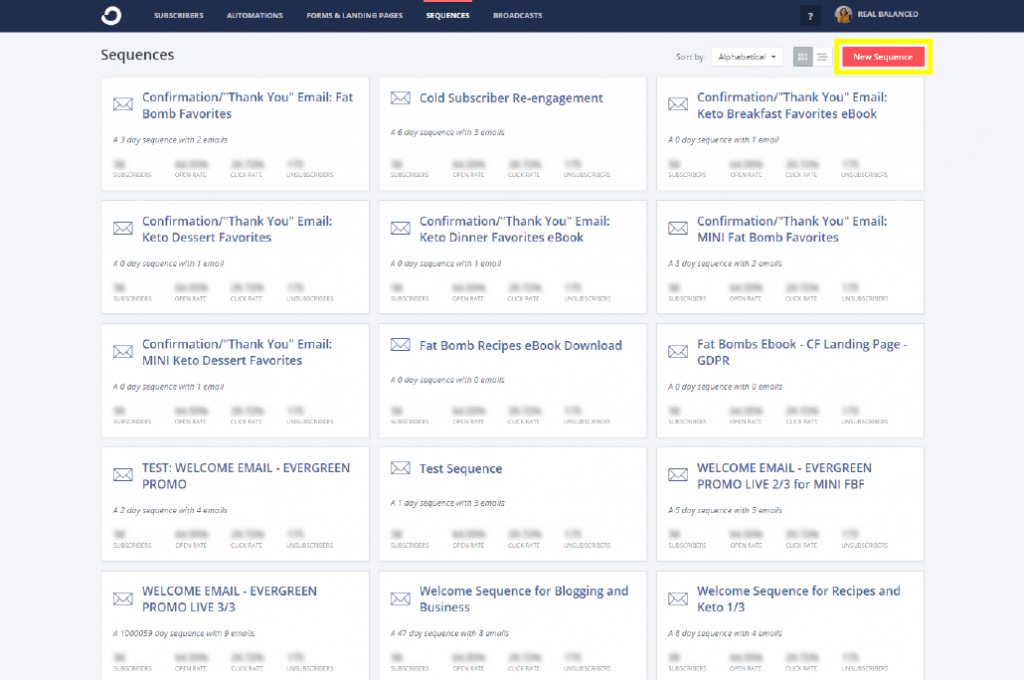
Click on New Sequence at the upper right-hand corner just below your ConvertKit account profile.
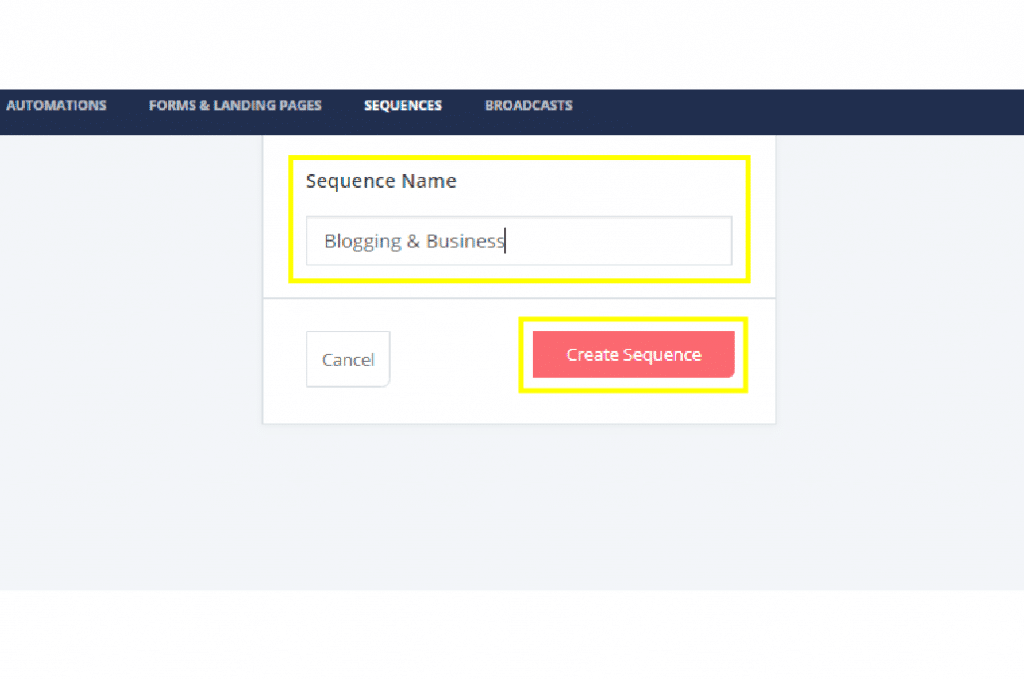
Name your sequence and click Create Sequence.
Update the Email Subject and Email Content.
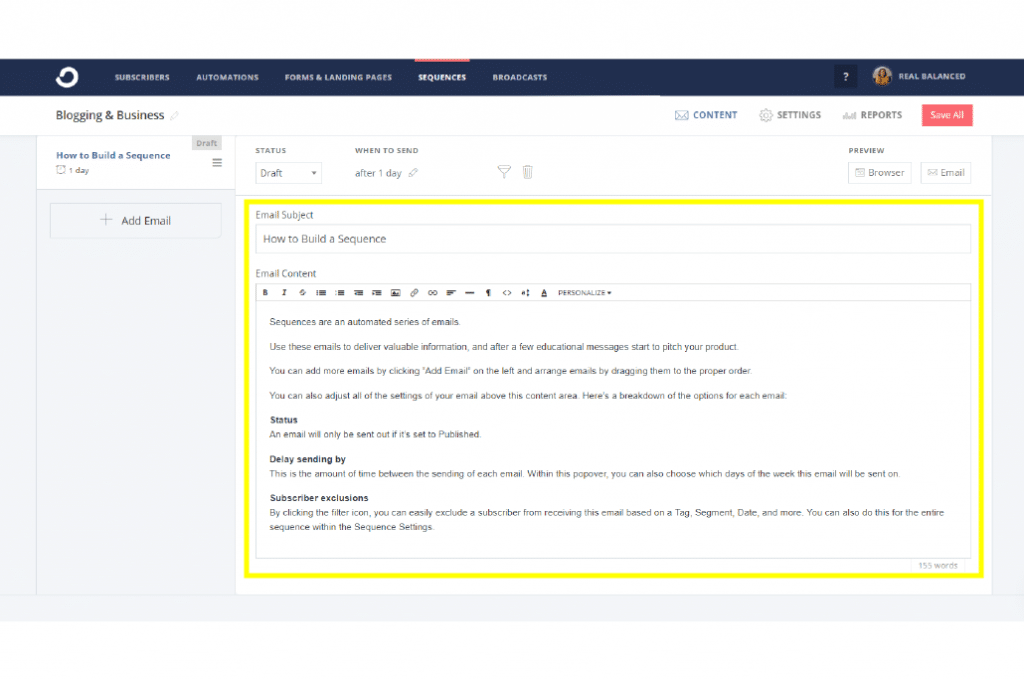
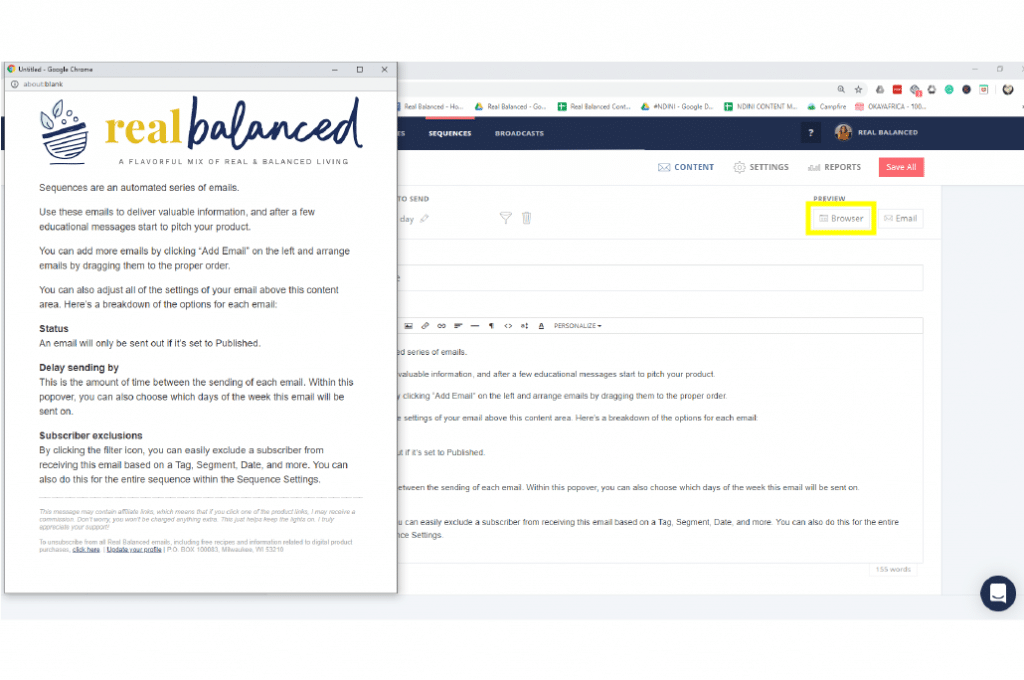
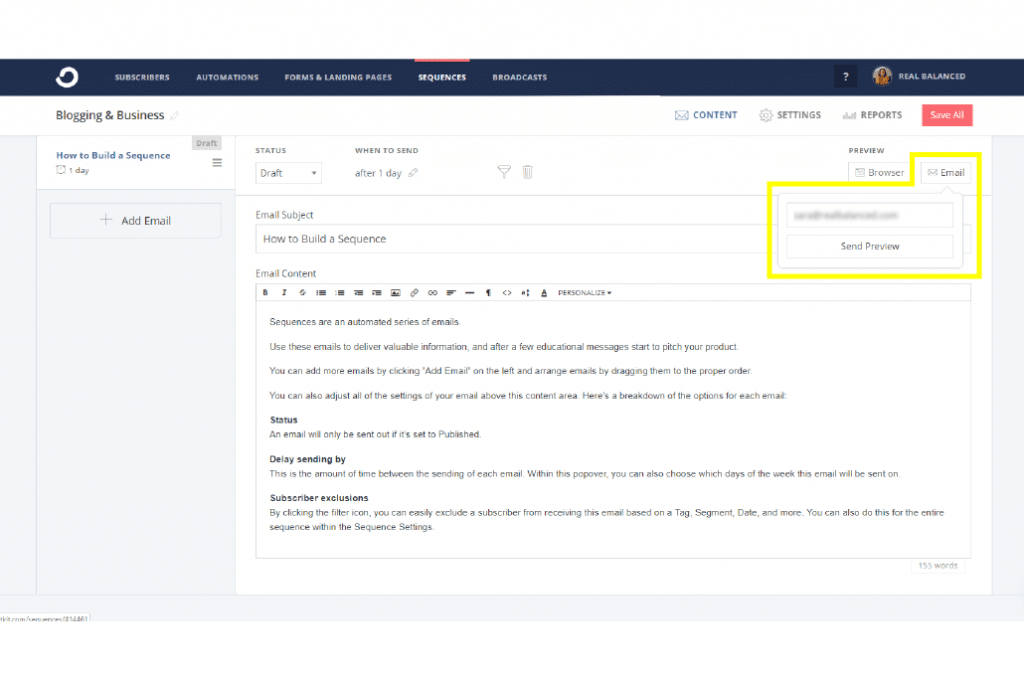
Preview your email sequence by clicking Browser view and/or sending yourself a sample copy by clicking on Email.
NOTE: We highly suggest doing the latter since the browser view does not always look the same as the sample email sent to your inbox.
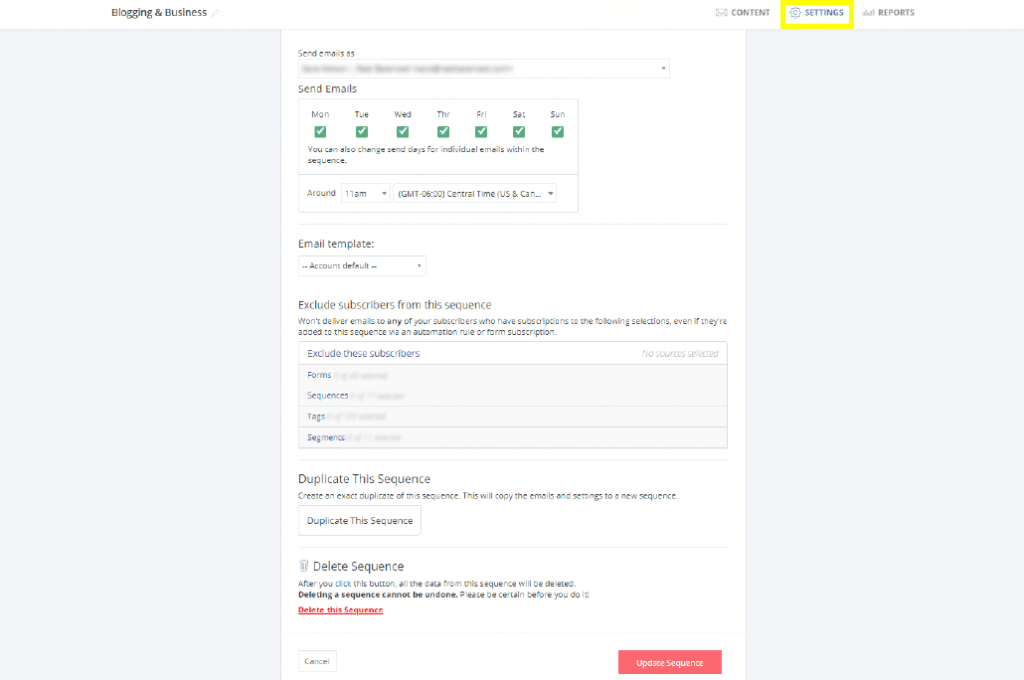
You can update when your sequence will send (day/time) in the Settings tab. It’s also where you can segment subscribers for this sequence, duplicate and/or delete the sequence.
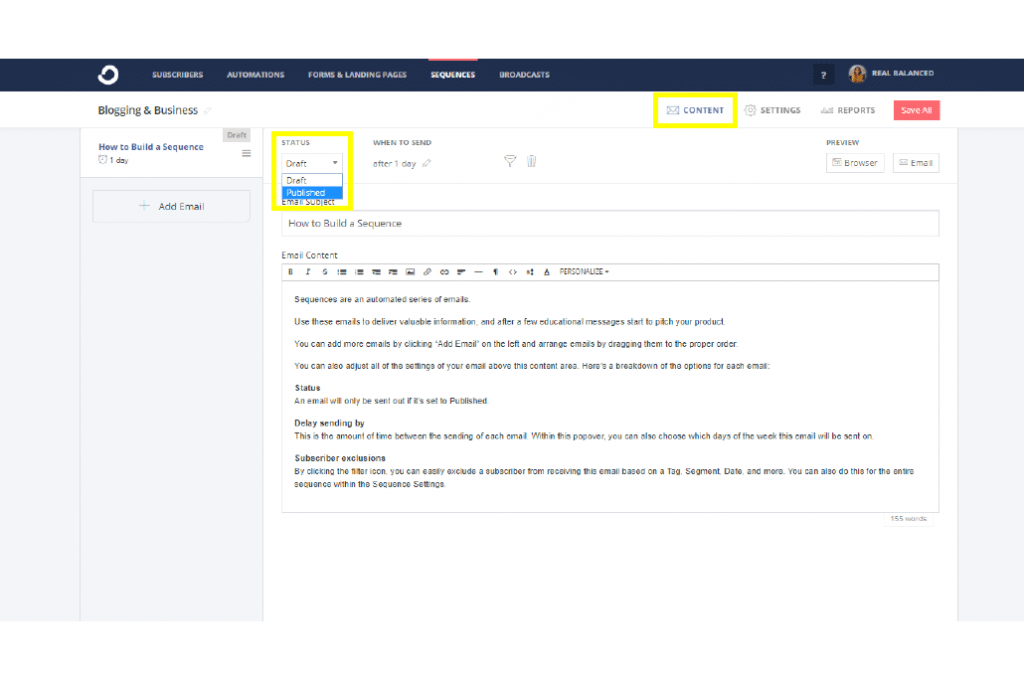
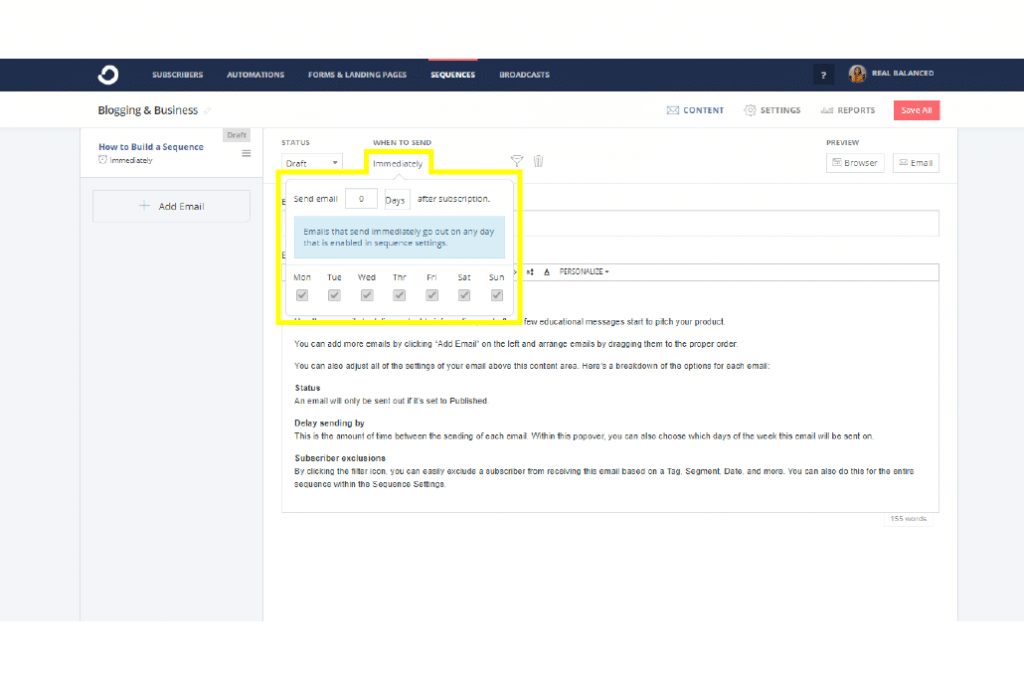
When you’re happy with your sequence, click the Status drop-down and choose Published. You can also change when the email sequence will send out by editing the WHEN TO SEND option. (NOTE: If you change the Send Email number to 0 then it will send out immediately.)
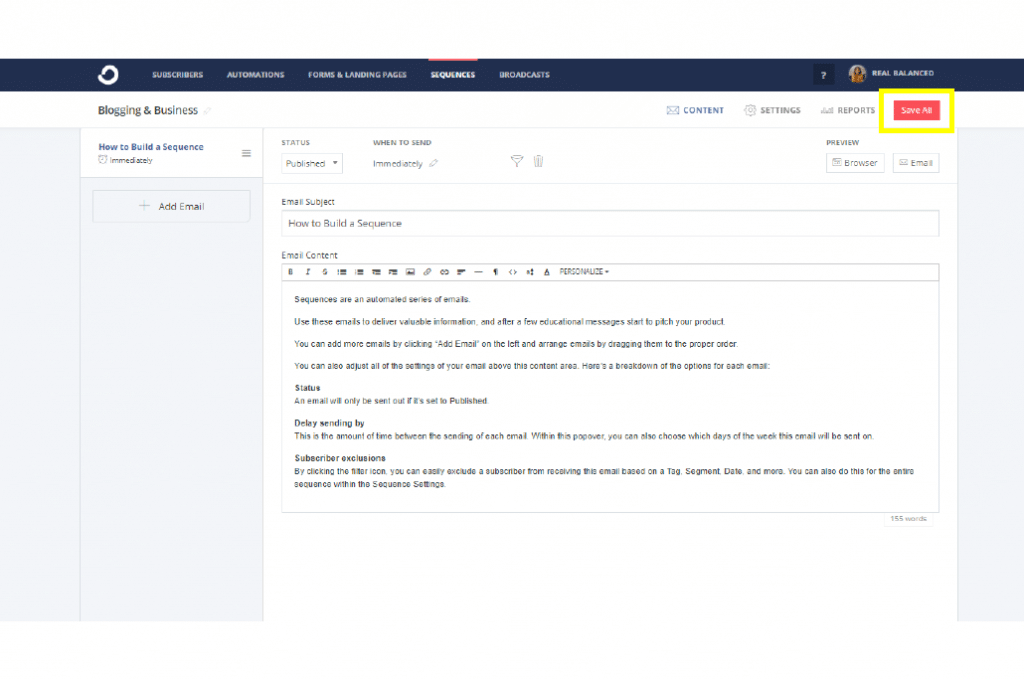
Click Save All when you’re done.
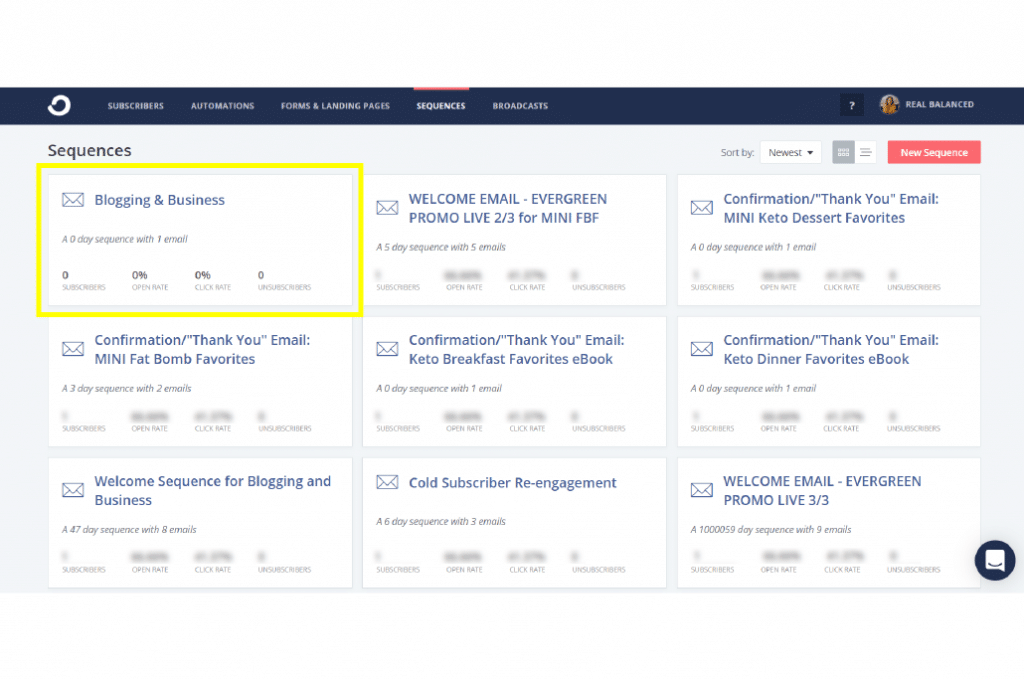
Now, when you click on the SEQUENCES tab again, the email sequence you created will be listed there.
How to set up an Automation in CovertKit
Log in to your ConvertKit account. Click on the AUTOMATION tab.
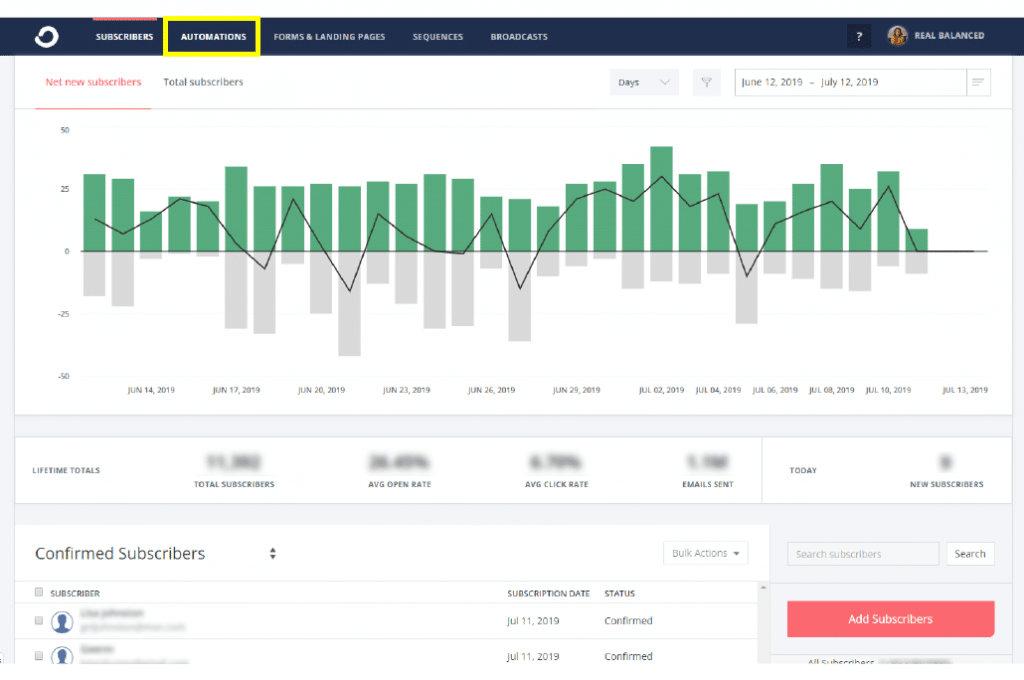
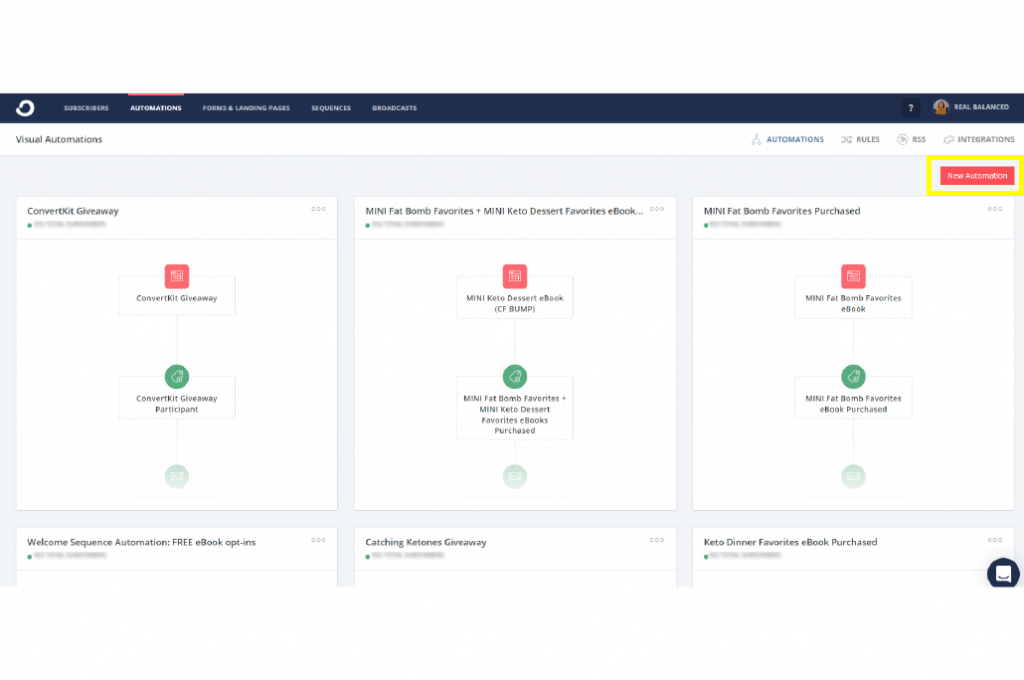
Select on New Automation.
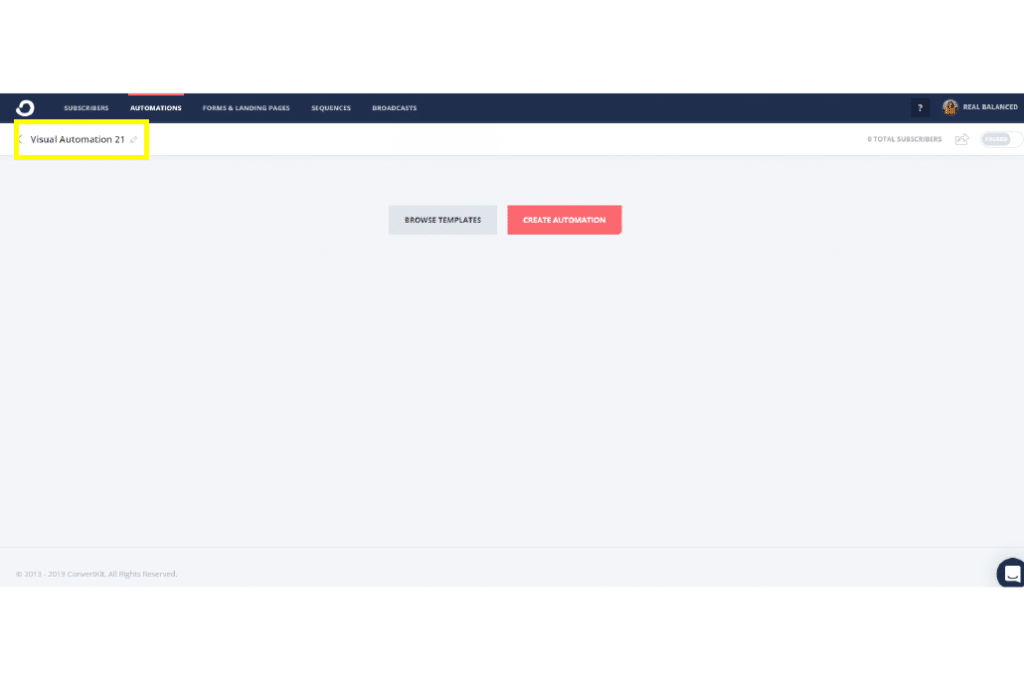
Click on the Pencil icon at the upper left-hand corner and name your visual automation.
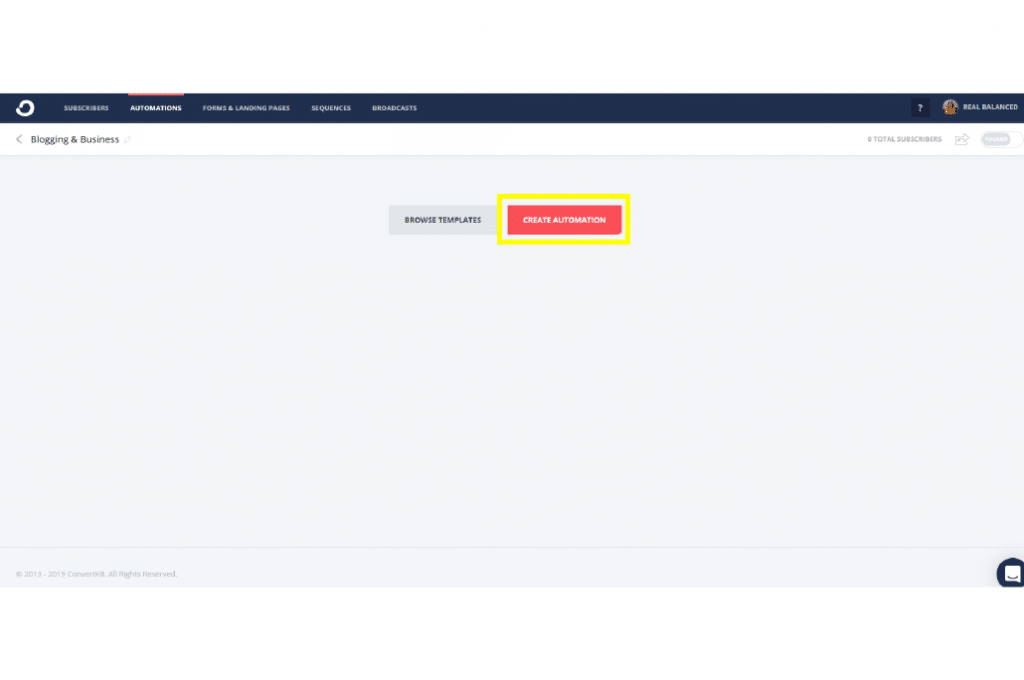
Choose CREATE AUTOMATION.
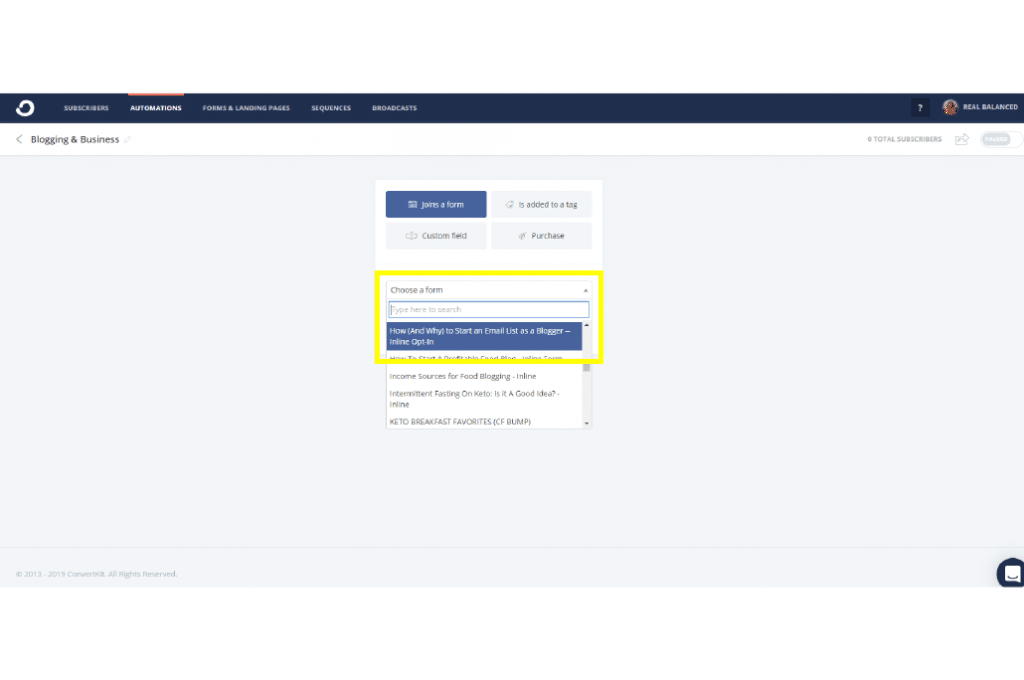
Choose the form you need to integrate with this automation. In this case, we’ll use the form we created named “How (And Why) to Start an Email List as a Blogger — Inline Opt-in”
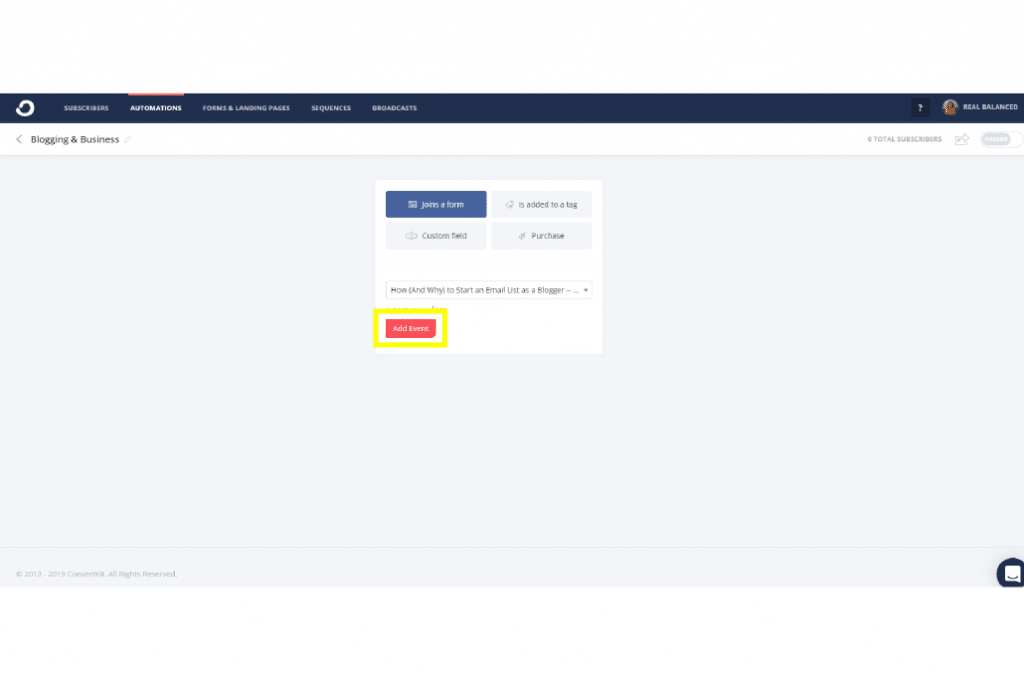
Click Add Event.
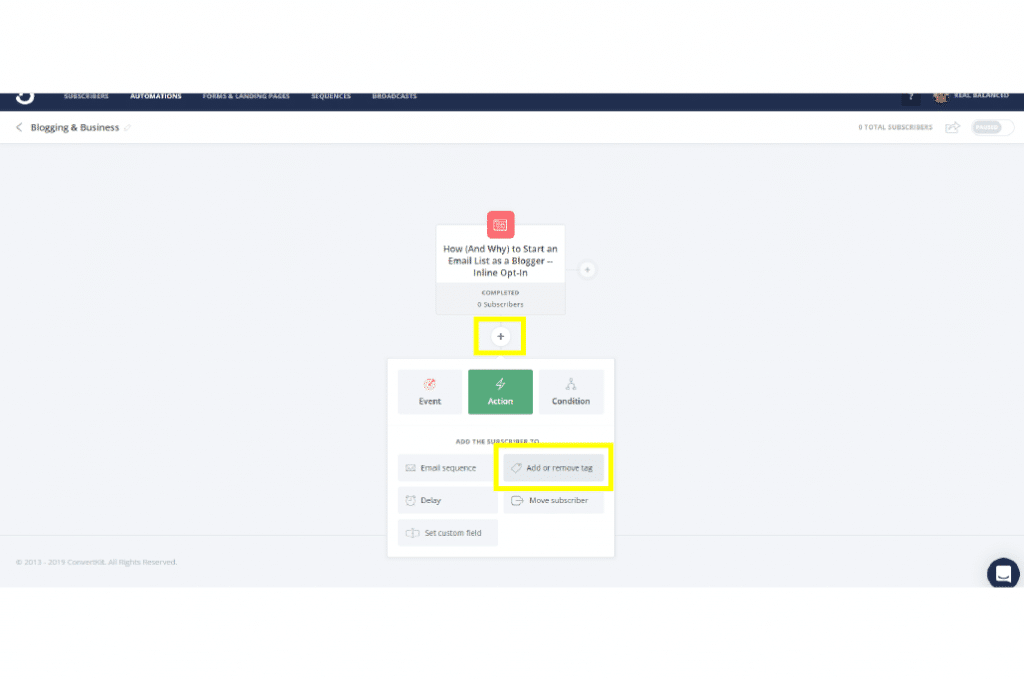
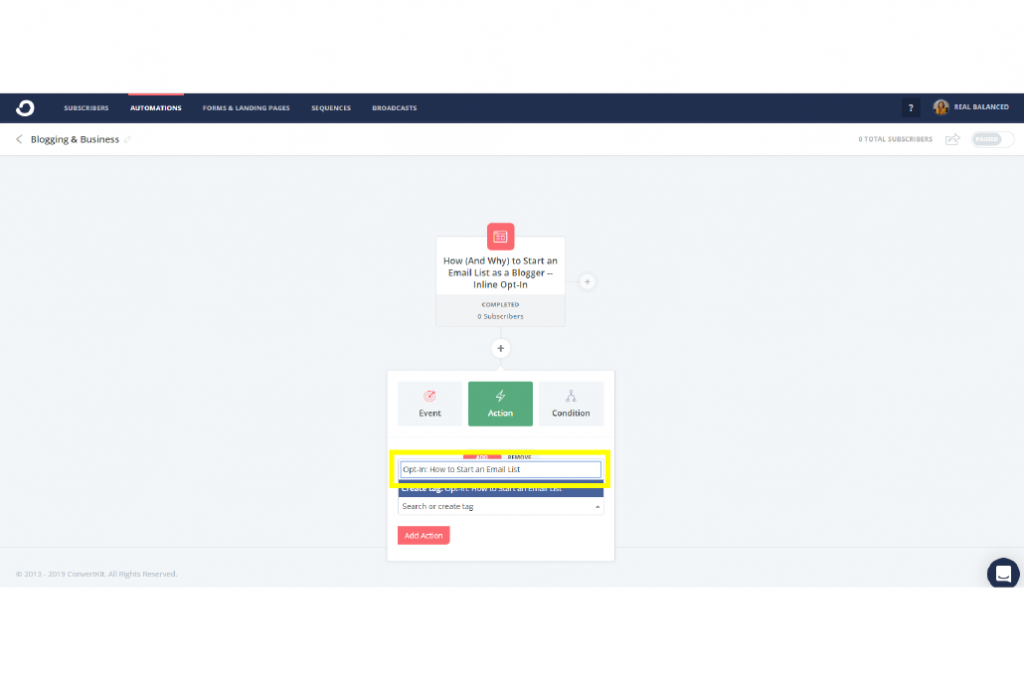
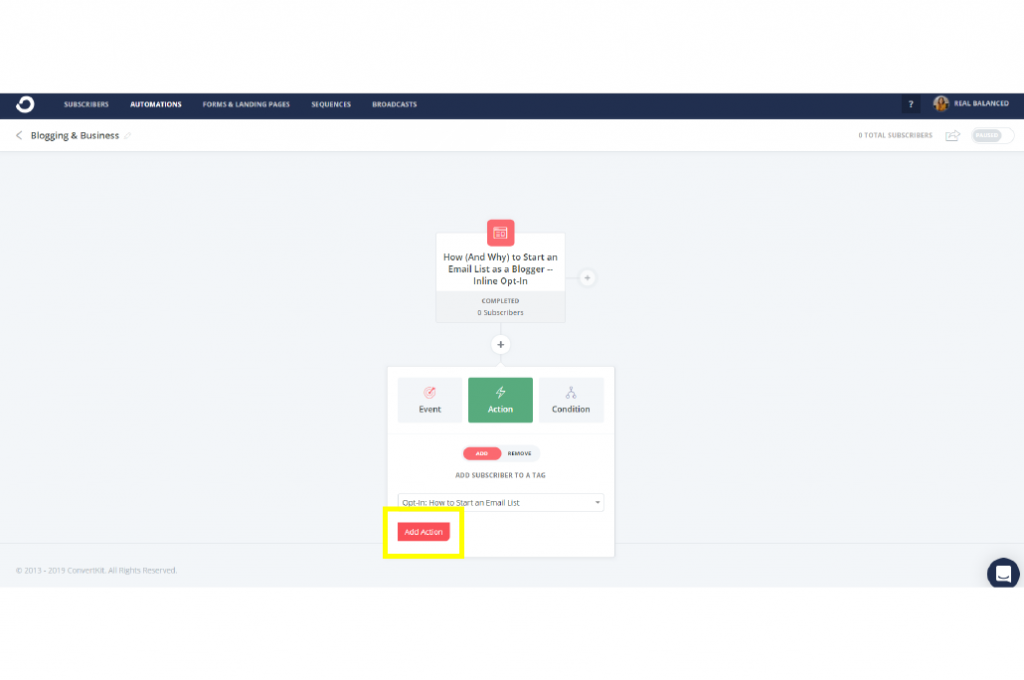
Click on the “+” to add another step. Choose Add or remove tag, then create a tag that best fits your visual automation. In this example, we’re labeling the tag Opt-In: How to Start an Email List. Then click Add Action to confirm this step.
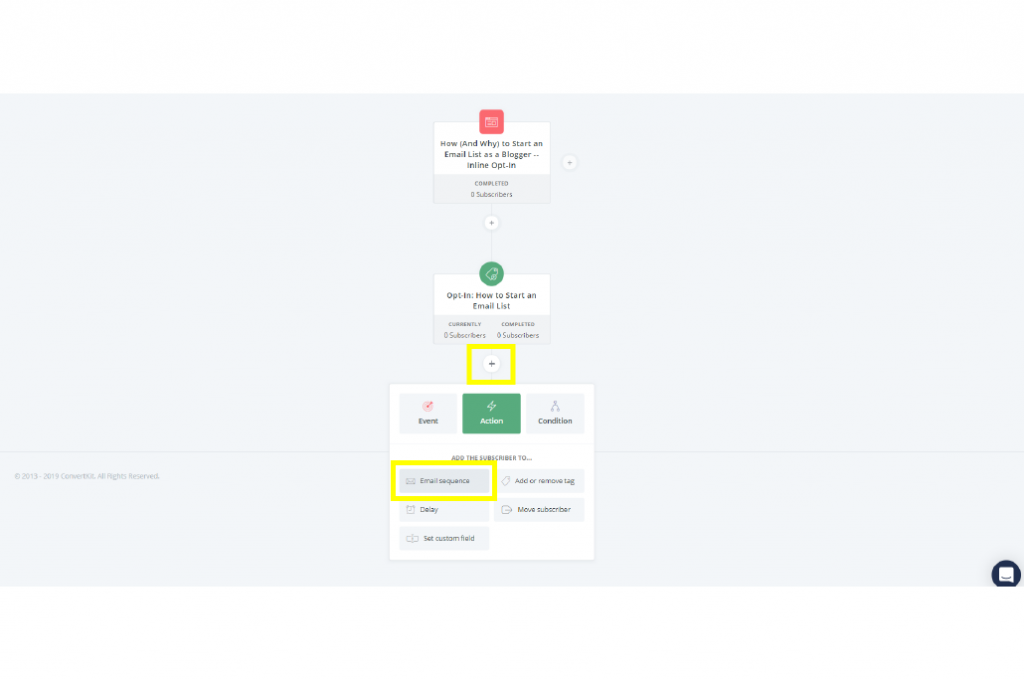
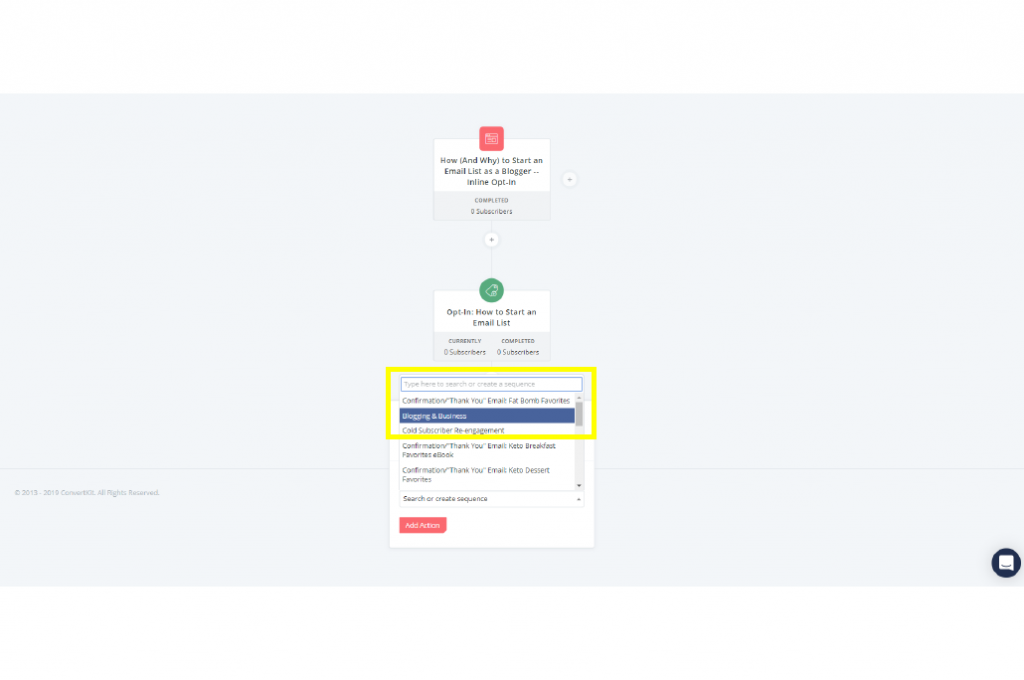
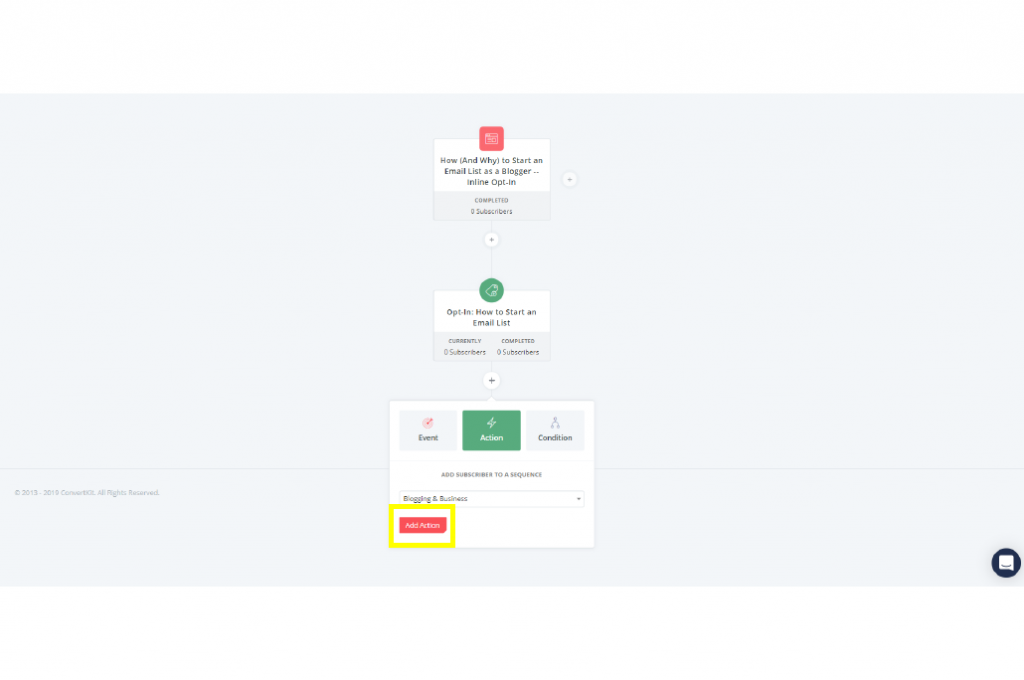
Click on the “+” again, and this time, choose (Add subscriber to…) Email Sequence. Pick the email sequence you want, which in this case is, Blogging & Business. Then click Add Action.
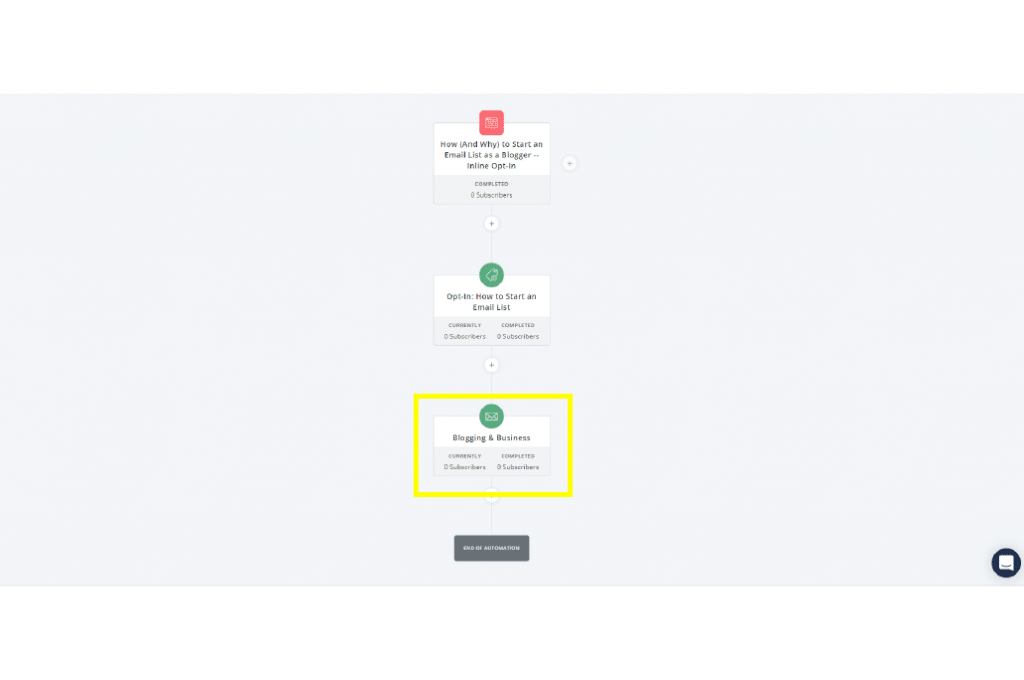
Once you’re content with your visual automation’s flow, scroll back up and turn your automation on.
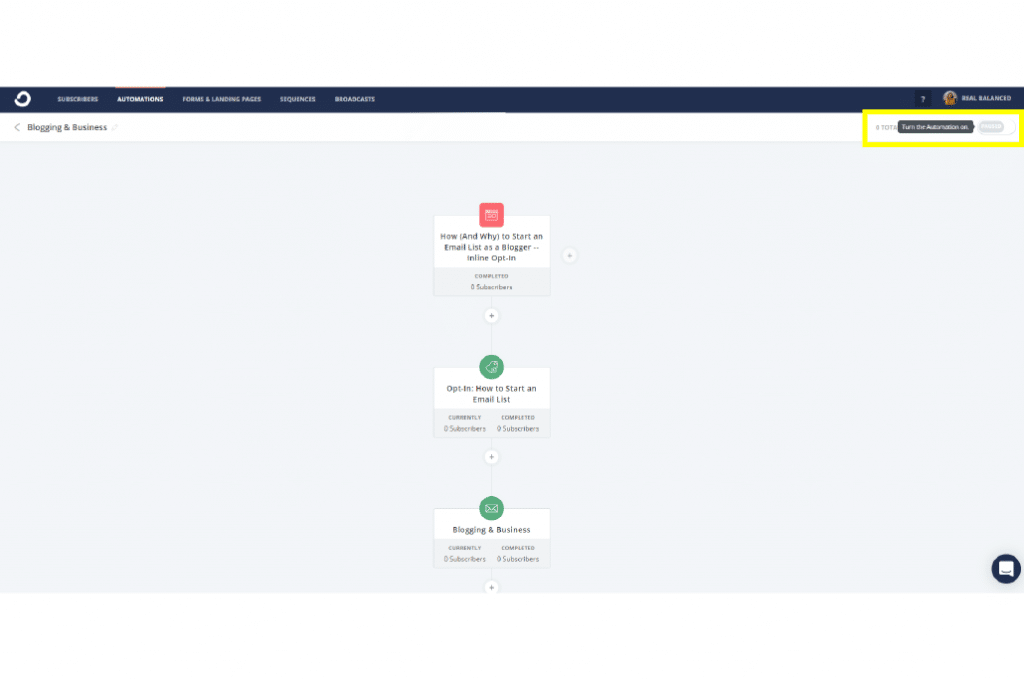
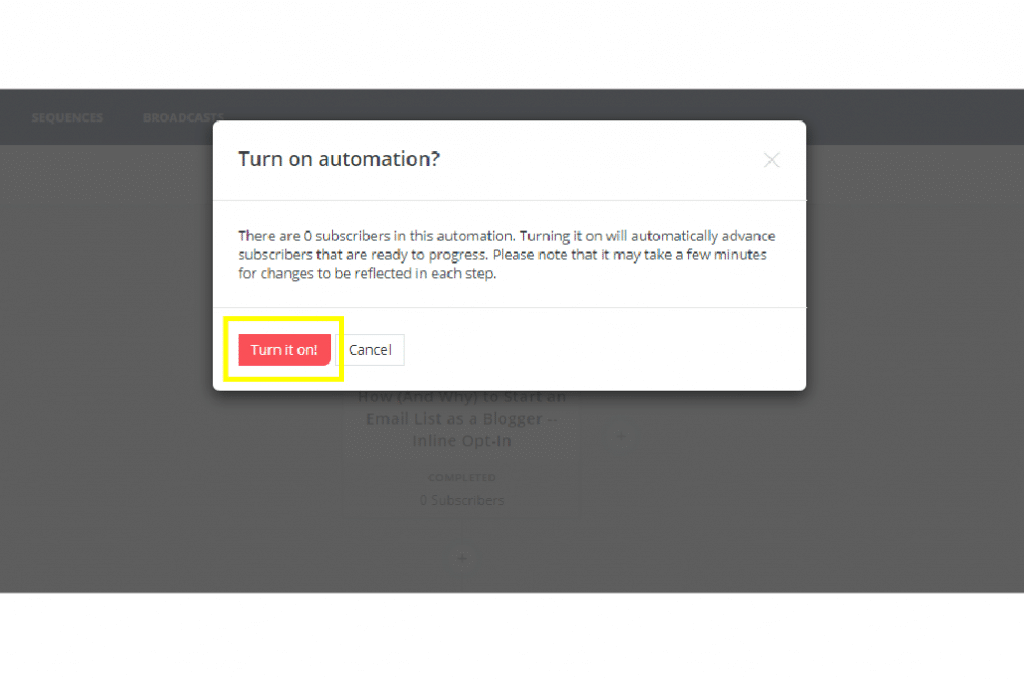
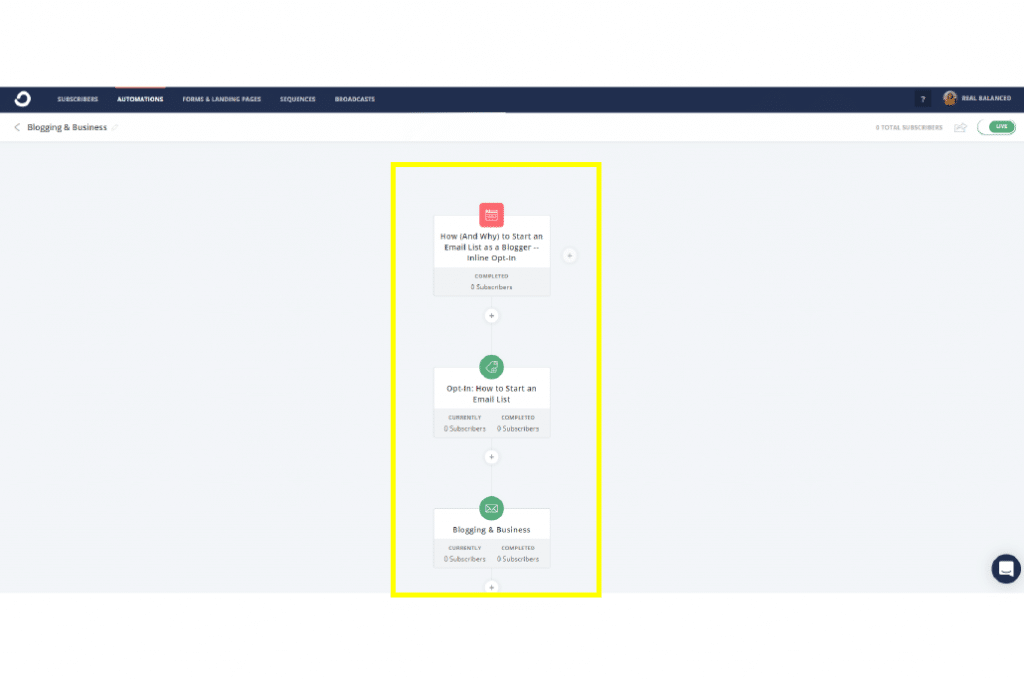
Congratulations! Your visual automation is LIVE! Test your flow by going through the steps yourself. Sign up through your form, see if you get the tag, check if you receive the email from the automated email sequence.
Now, let’s talk about using my other favorite email marketing tool, Opt In Monster, which I use to create impressive opt-in forms and pop-ups.
How to create an inline campaign on Opt In Monster
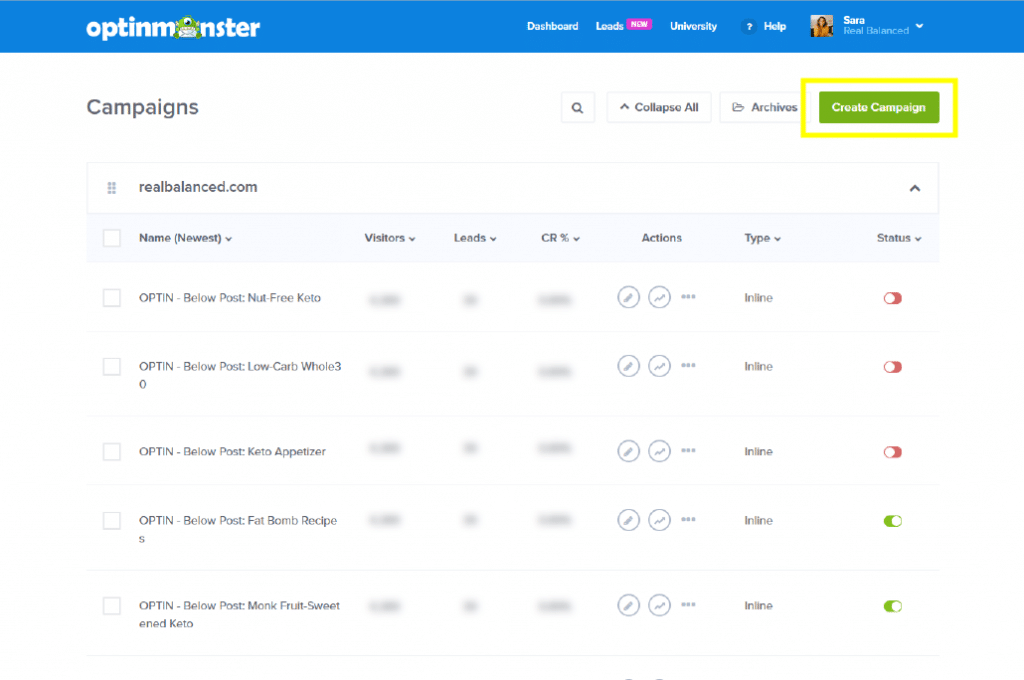
Log in to your Opt In Monster account and click on Create Campaign.
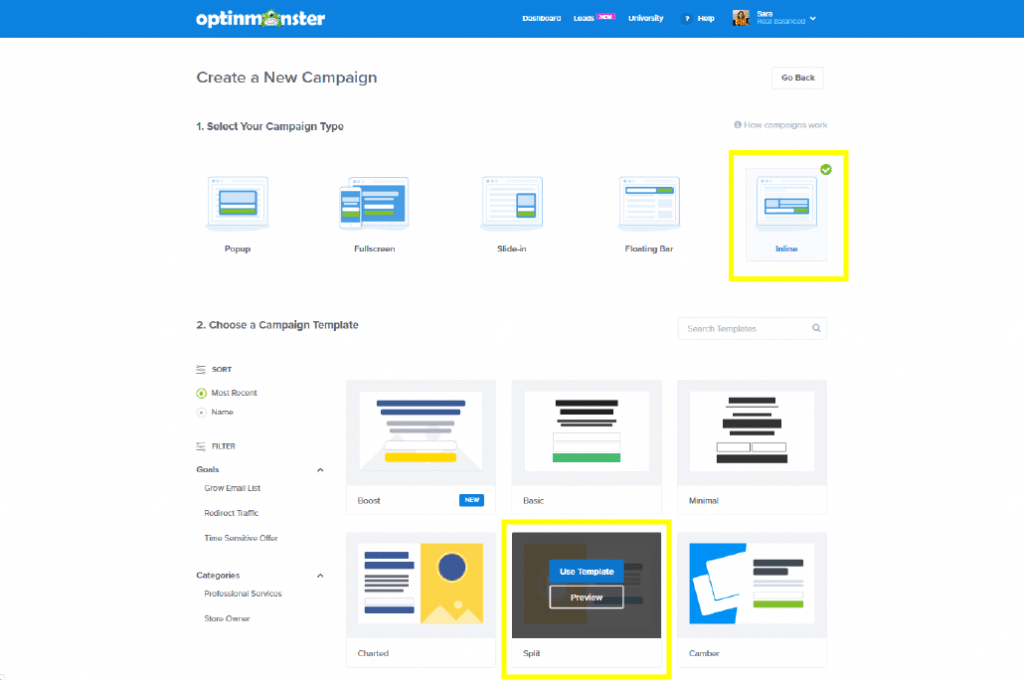
Pick a campaign type and a campaign template. In this example, we used Inline and Split.
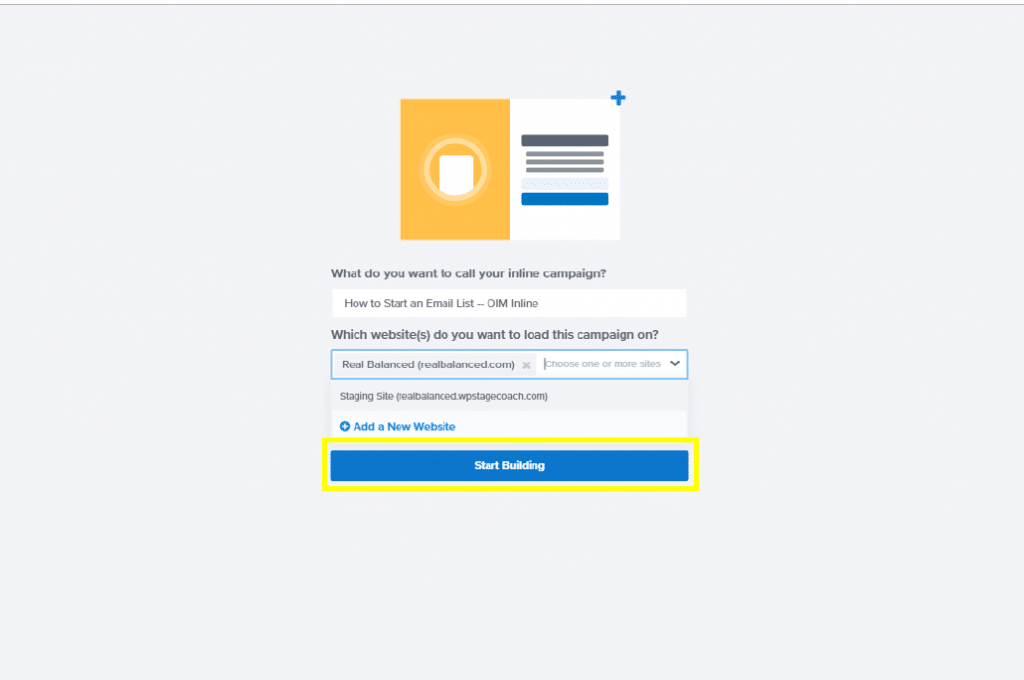
Name your inline campaign and choose which website to load your campaign on. Then, click Start Building.
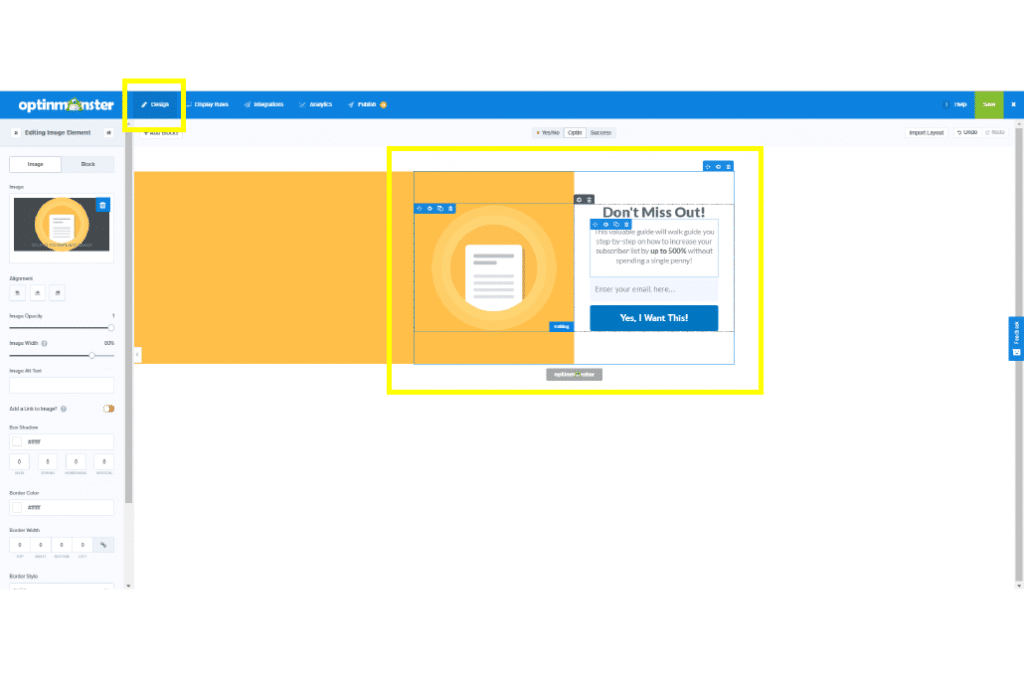
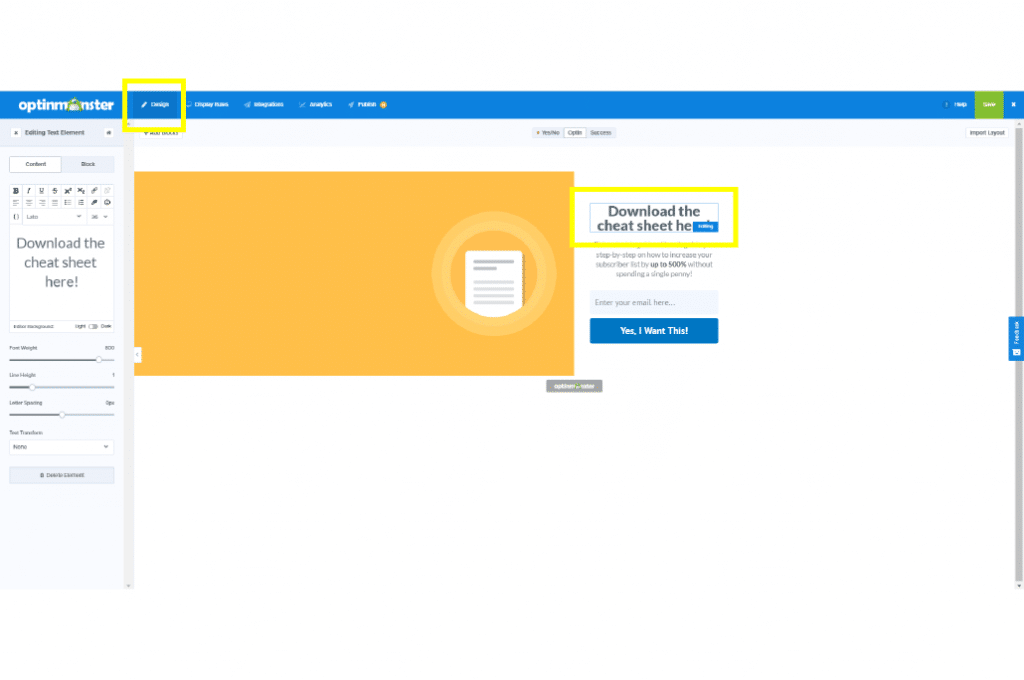
On the Design tab, you can click on the individual elements to change pre-existing image and text.
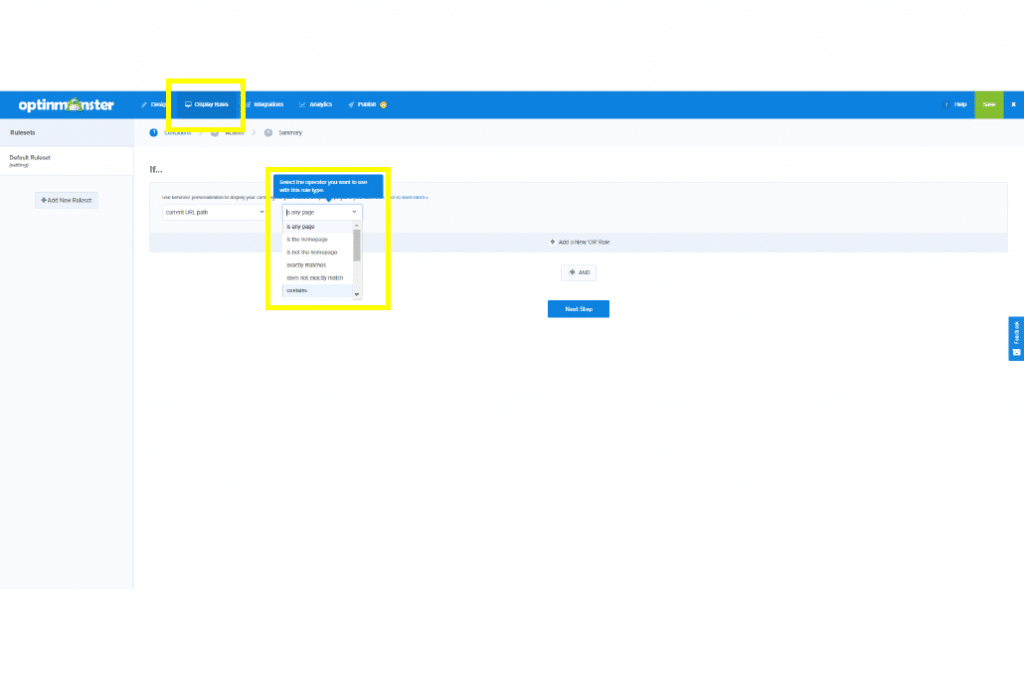
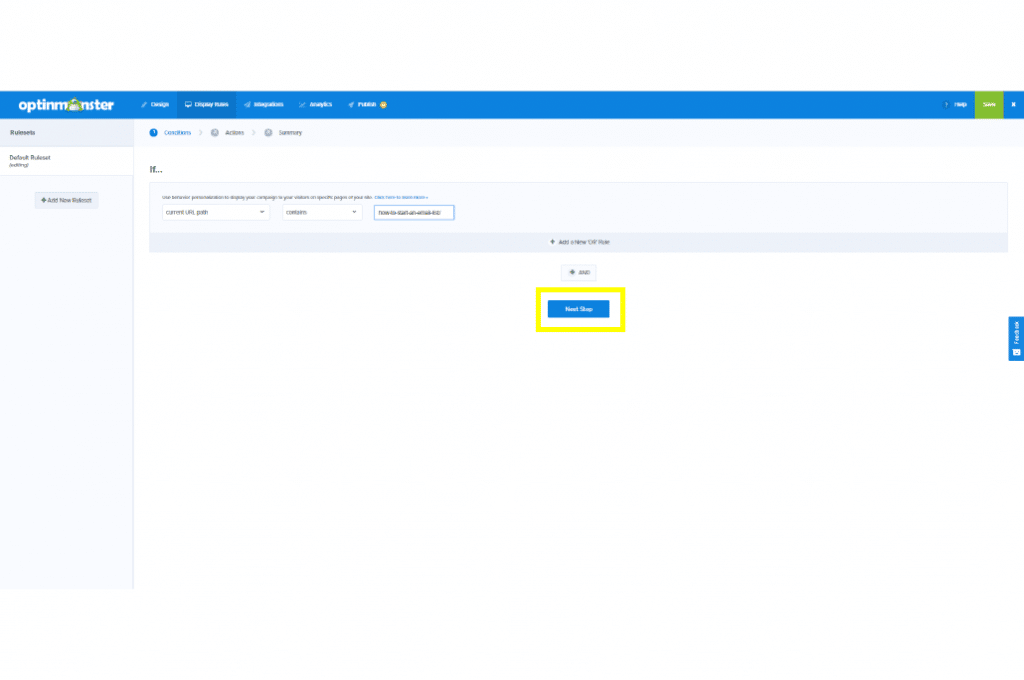
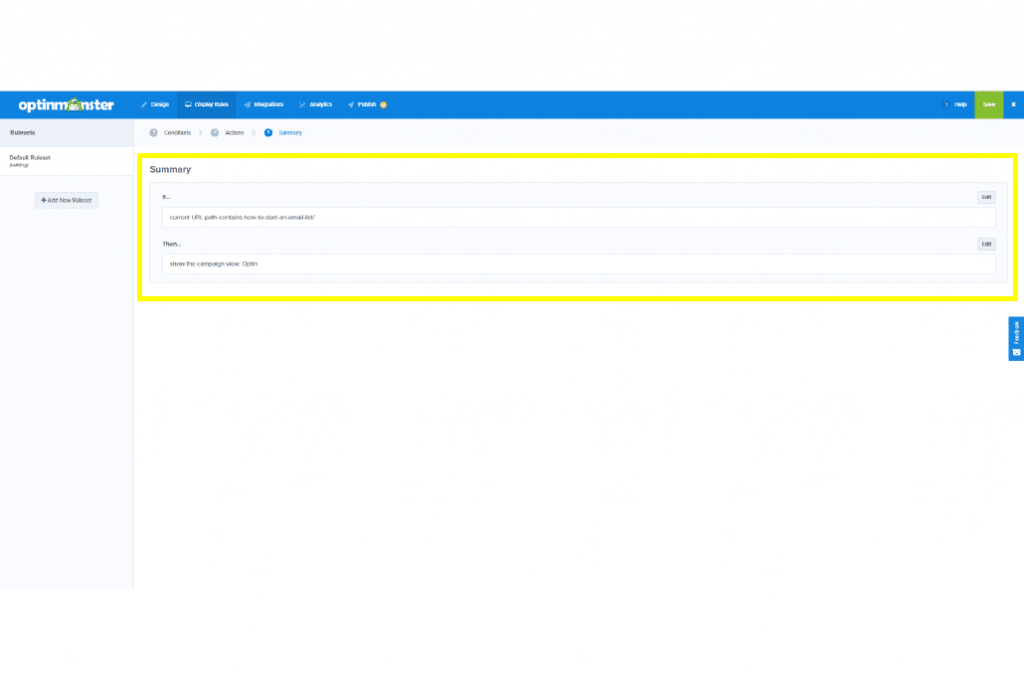
Next, click on the Display Rules tab. This is where you’ll set the conditions on where your inline campaign will show up. Once you’re done setting those condition(s) click Next Step and you’ll see the Summary of the conditions you made.
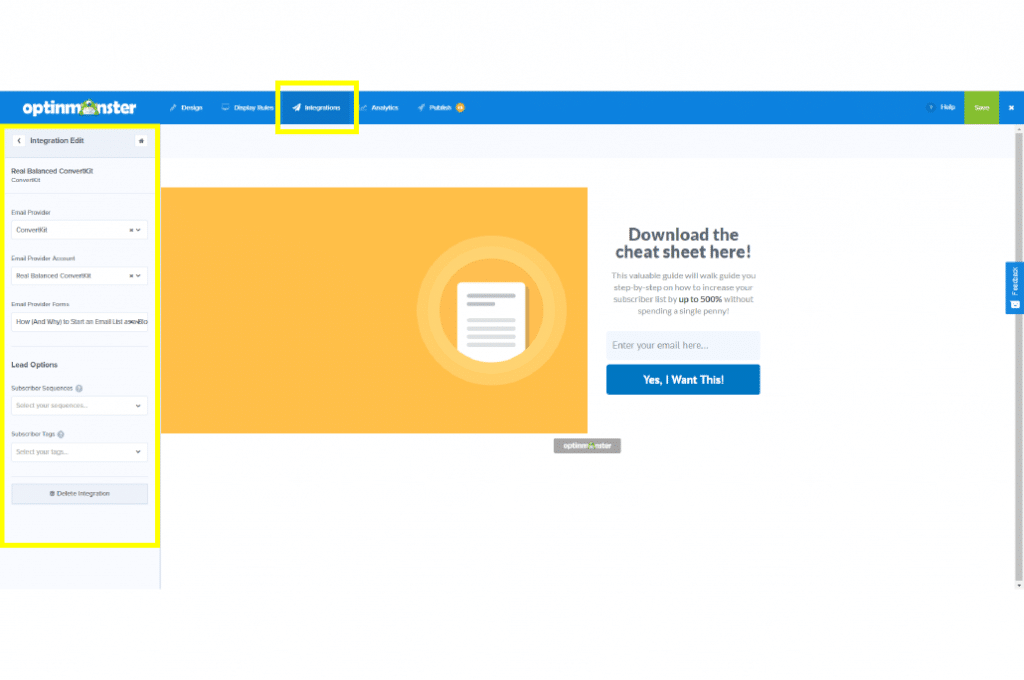
Click on the Integrations tab. This is where you connect your Opt In Monster inline campaign to your email delivery service. In our case, we use ConvertKit and have set up an automation that is triggered once a subscriber completes the form.
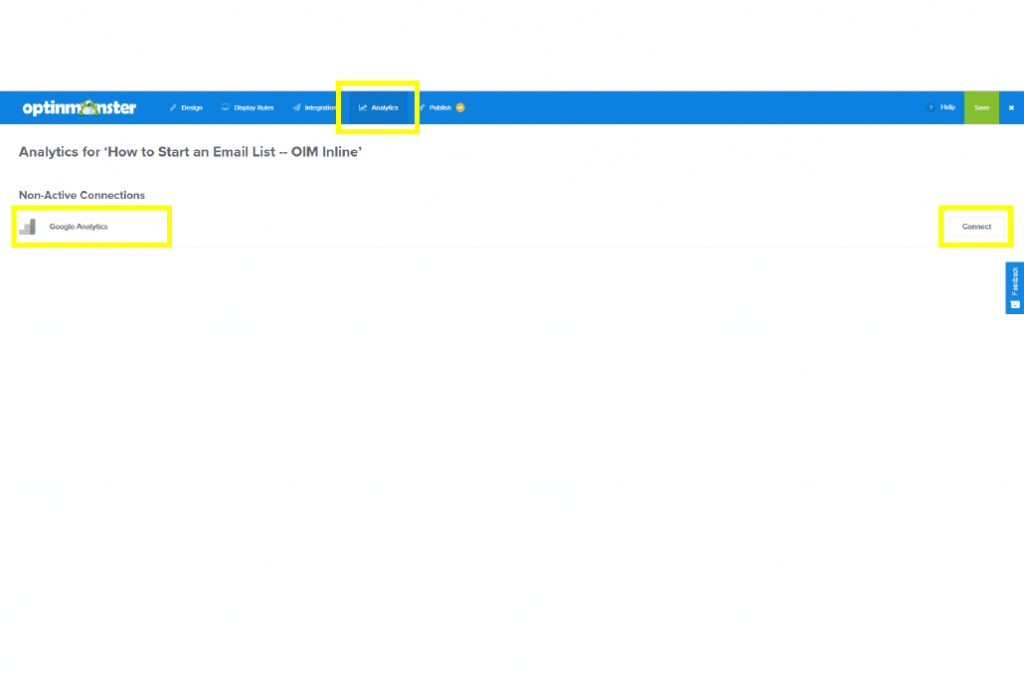
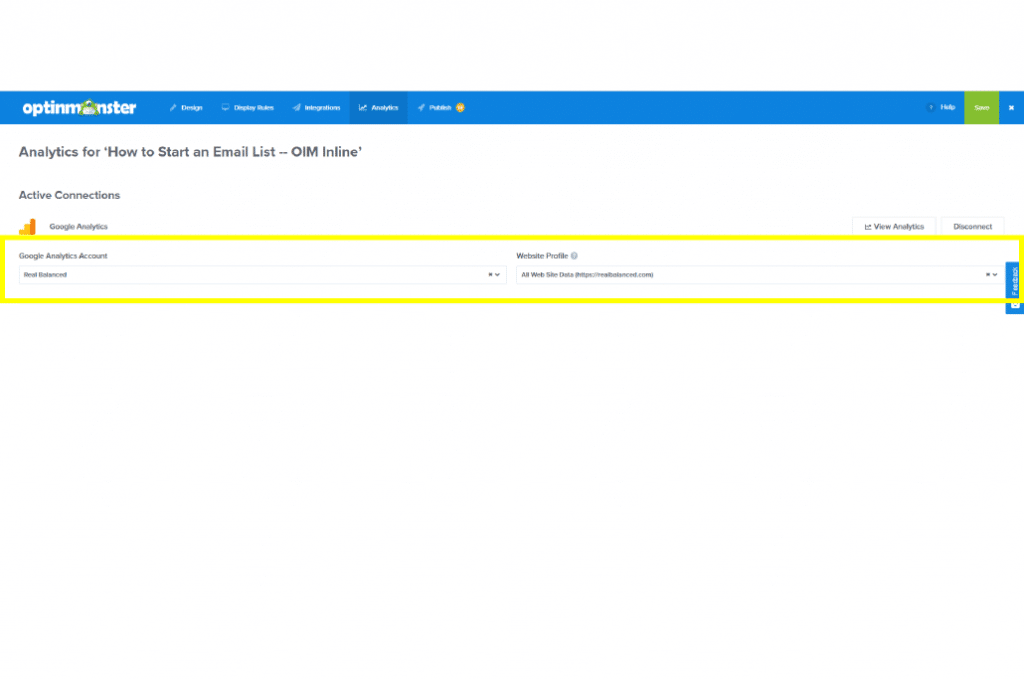
Once integrations are done, click on Analytics. You can link your site’s Google Analytics account with your Opt In Monster campaign, which will allow OIM to track the click rates and other statistics for this campaign. Click on Connect and pick the account you need to link to this inline campaign.
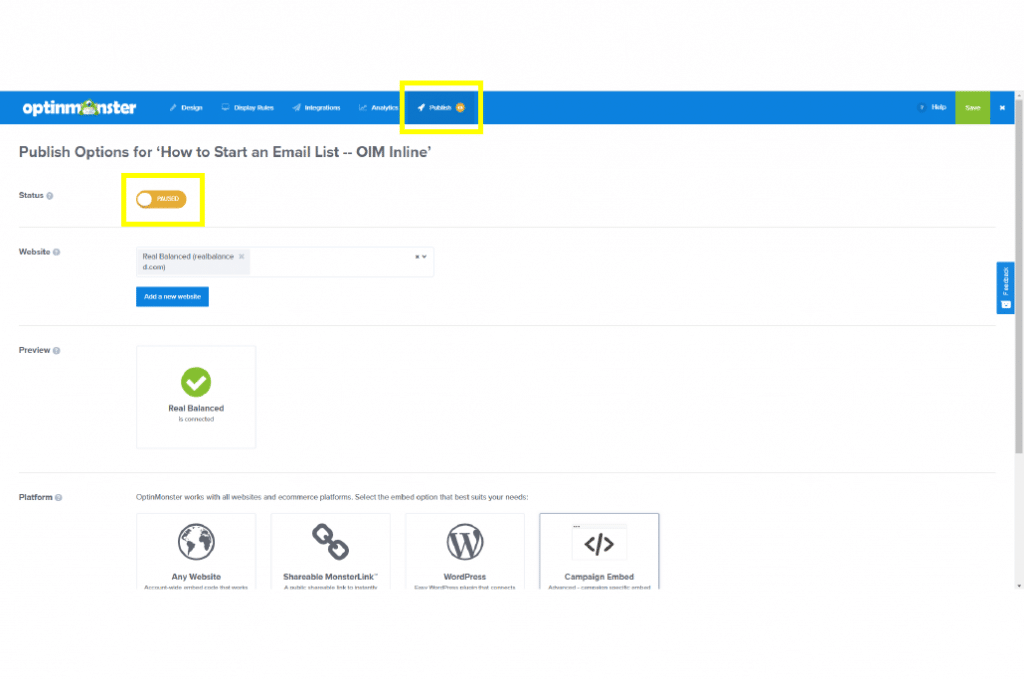
Next is the Publish tab. This is where you turn your campaign ON. Simply click PAUSED (yellow orange) and it will switch to LIVE (light green).
Don’t forget to hit Save when you’re done!
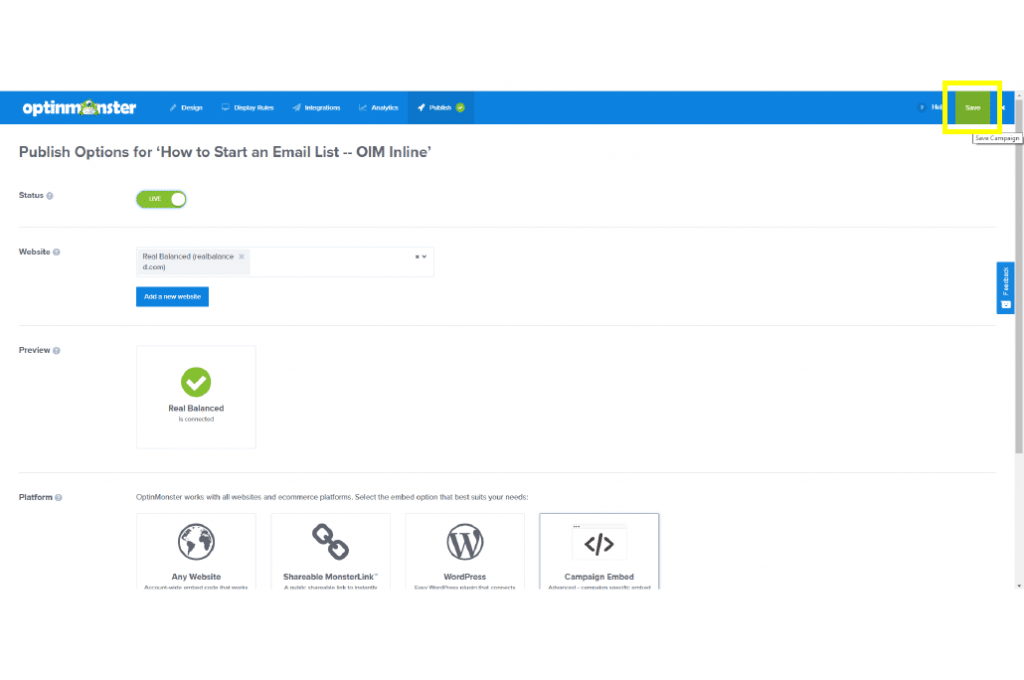
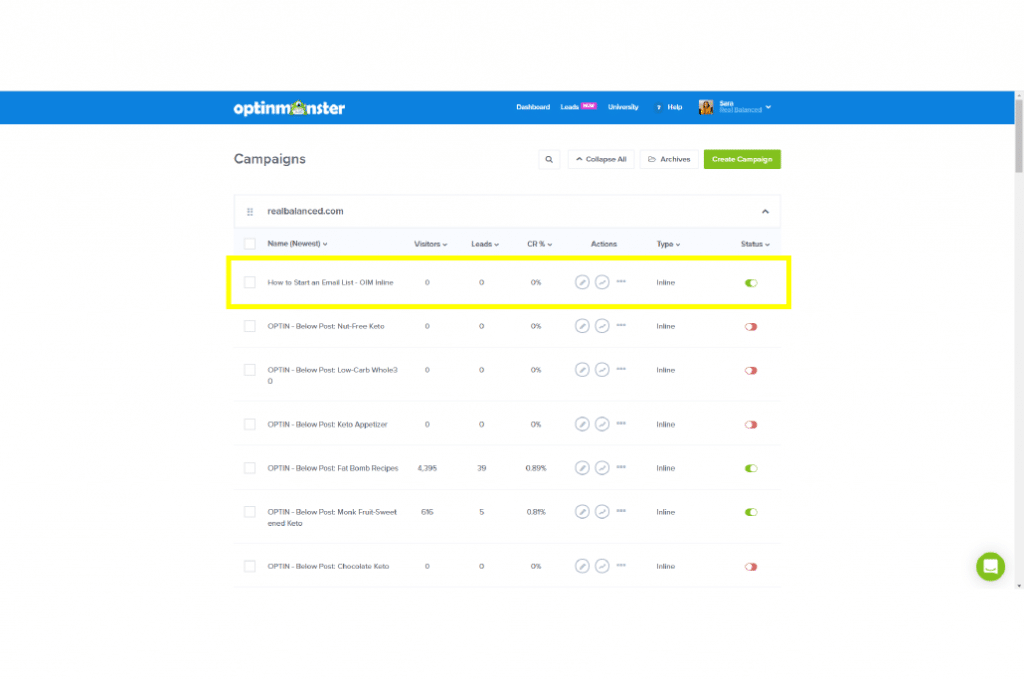
Way to go! Your Opt In Monster inline campaign is ready to be integrated to your website.
Sign Up For ConvertKit and Opt In Monster
I really love using these services to build and grow my email list and highly suggest both ConvertKit and Opt In Monster to those who want to run a highly profitable blogging business.
So, are you ready to start growing your email list? Let me know in the comments what your action plan is!





Leave a Reply